Customize Consent Preferences

We use cookies to help you navigate efficiently and perform certain functions. You will find detailed information about all cookies under each consent category below.

The cookies that are categorized as "Necessary" are stored on your browser as they are essential for enabling the basic functionalities of the site. ... 

Always Active

Necessary cookies are required to enable the basic features of this site, such as providing secure log-in or adjusting your consent preferences. These cookies do not store any personally identifiable data.

No cookies to display.

Functional cookies help perform certain functionalities like sharing the content of the website on social media platforms, collecting feedback, and other third-party features.

No cookies to display.

Analytical cookies are used to understand how visitors interact with the website. These cookies help provide information on metrics such as the number of visitors, bounce rate, traffic source, etc.

No cookies to display.

Performance cookies are used to understand and analyze the key performance indexes of the website which helps in delivering a better user experience for the visitors.

No cookies to display.

Advertisement cookies are used to provide visitors with customized advertisements based on the pages you visited previously and to analyze the effectiveness of the ad campaigns.

No cookies to display.

Try out RDK Video

Created on January 16, 2023

Raspberry Pi Usage Guide

Raspberry Pi series consists of low-cost, credit card sized single board computers. These models feature an ARM CPU and an on-chip graphics processing unit (GPU). Raspberry Pi uses an SD card, which allows users to swap out different versions of the operating system or software updates, thereby speeding the development and testing process. This makes it an excellent tool for developing new applications or software and showcasing them to customers in remote locations or at trade shows. 

Follow the steps given below to download the RPI image, flash it, and to bring up RPI with flashed image.

Download pre-compiled image

Click on Video IP Stable Image – Dunfell to download the pre-compiled RDK dunfell image.

to download the pre-compiled RDK dunfell image. 

Flash image

This section outlines two methods for flashing: Flashing the SD Card (flashing steps in a Linux environment) and using balenaEtcher App (flashing in windows).

Flashing the SD Card

1. Insert an SD card in the SD card port of the USB SD card reader (or Laptop).
    (Prefer to use 32gb sd card and there should be minimum 12gb free space available in the device.)

2. Verify that the SD card has been detected by executing one of the commands listed below.

Plain text
Copy to clipboard
Open code in new window
EnlighterJS 3 Syntax Highlighter
$lsblk
$sudo fdisk –l
$lsblk $sudo fdisk –l
$lsblk
$sudo fdisk –l
Plain text
Copy to clipboard
Open code in new window
EnlighterJS 3 Syntax Highlighter
$ lsblk
NAME MAJ:MIN RM SIZE RO TYPE MOUNTPOINT
sda 8:0 0 931.5G 0 disk
├─sda1 8:1 0 350M 0 part
├─sda2 8:2 0 3G 0 part
├─sda3 8:3 0 896.4G 0 part /
├─sda4 8:4 0 1K 0 part
└─sda5 8:5 0 31.8G 0 part [SWAP]
sdb 8:16 1 14.9G 0 disk
├─sdb1 8:17 1 40M 0 part /media/raspberrypi
└─sdb2 8:18 1 552M 0 part /media/dd5efb34-1d40-4e50-bbc2-a75d3e02af97
sr0 11:0 1 1024M 0 rom
$ lsblk NAME MAJ:MIN RM SIZE RO TYPE MOUNTPOINT sda 8:0 0 931.5G 0 disk ├─sda1 8:1 0 350M 0 part ├─sda2 8:2 0 3G 0 part ├─sda3 8:3 0 896.4G 0 part / ├─sda4 8:4 0 1K 0 part └─sda5 8:5 0 31.8G 0 part [SWAP] sdb 8:16 1 14.9G 0 disk ├─sdb1 8:17 1 40M 0 part /media/raspberrypi └─sdb2 8:18 1 552M 0 part /media/dd5efb34-1d40-4e50-bbc2-a75d3e02af97 sr0 11:0 1 1024M 0 rom
$ lsblk
NAME   MAJ:MIN RM   SIZE RO TYPE MOUNTPOINT
sda      8:0    0 931.5G  0 disk
├─sda1   8:1    0   350M  0 part
├─sda2   8:2    0     3G  0 part
├─sda3   8:3    0 896.4G  0 part /
├─sda4   8:4    0     1K  0 part
└─sda5   8:5    0  31.8G  0 part [SWAP]
sdb      8:16   1  14.9G  0 disk
├─sdb1   8:17   1    40M  0 part /media/raspberrypi
└─sdb2   8:18   1   552M  0 part /media/dd5efb34-1d40-4e50-bbc2-a75d3e02af97
sr0     11:0    1  1024M  0 rom

3. Type the following command to ensure that the partitions, if present, on the SD card are not mounted.

Plain text
Copy to clipboard
Open code in new window
EnlighterJS 3 Syntax Highlighter
$mount
$mount
$mount
Plain text
Copy to clipboard
Open code in new window
EnlighterJS 3 Syntax Highlighter
$ mount
/dev/sda3 on / type ext4 (rw,errors=remount-ro)
proc on /proc type proc (rw,noexec,nosuid,nodev)
sysfs on /sys type sysfs (rw,noexec,nosuid,nodev)
none on /sys/fs/fuse/connections type fusectl (rw)
none on /sys/kernel/debug type debugfs (rw)
none on /sys/kernel/security type securityfs (rw)
udev on /dev type devtmpfs (rw,mode=0755)
devpts on /dev/pts type devpts (rw,noexec,nosuid,gid=5,mode=0620)
tmpfs on /run type tmpfs (rw,noexec,nosuid,size=10%,mode=0755)
none on /run/lock type tmpfs (rw,noexec,nosuid,nodev,size=5242880)
none on /run/shm type tmpfs (rw,nosuid,nodev)
binfmt_misc on /proc/sys/fs/binfmt_misc type binfmt_misc (rw,noexec,nosuid,nodev)
rpc_pipefs on /run/rpc_pipefs type rpc_pipefs (rw)
nfsd on /proc/fs/nfsd type nfsd (rw)
none on /tmp/guest-zdrO76 type tmpfs (rw,mode=700)
gvfs-fuse-daemon on /var/lib/lightdm/.gvfs type fuse.gvfs-fuse-daemon (rw,nosuid,nodev,user=lightdm)
/dev/sdb1 on /media/raspberrypi type vfat (rw,nosuid,nodev,uid=136,gid=148,shortname=mixed,dmask=0077,utf8=1,showexec,flush,uhelper=udisks)
/dev/sdb2 on /media/dd5efb34-1d40-4e50-bbc2-a75d3e02af97 type ext3 (rw,nosuid,nodev,uhelper=udisks)
$ mount /dev/sda3 on / type ext4 (rw,errors=remount-ro) proc on /proc type proc (rw,noexec,nosuid,nodev) sysfs on /sys type sysfs (rw,noexec,nosuid,nodev) none on /sys/fs/fuse/connections type fusectl (rw) none on /sys/kernel/debug type debugfs (rw) none on /sys/kernel/security type securityfs (rw) udev on /dev type devtmpfs (rw,mode=0755) devpts on /dev/pts type devpts (rw,noexec,nosuid,gid=5,mode=0620) tmpfs on /run type tmpfs (rw,noexec,nosuid,size=10%,mode=0755) none on /run/lock type tmpfs (rw,noexec,nosuid,nodev,size=5242880) none on /run/shm type tmpfs (rw,nosuid,nodev) binfmt_misc on /proc/sys/fs/binfmt_misc type binfmt_misc (rw,noexec,nosuid,nodev) rpc_pipefs on /run/rpc_pipefs type rpc_pipefs (rw) nfsd on /proc/fs/nfsd type nfsd (rw) none on /tmp/guest-zdrO76 type tmpfs (rw,mode=700) gvfs-fuse-daemon on /var/lib/lightdm/.gvfs type fuse.gvfs-fuse-daemon (rw,nosuid,nodev,user=lightdm) /dev/sdb1 on /media/raspberrypi type vfat (rw,nosuid,nodev,uid=136,gid=148,shortname=mixed,dmask=0077,utf8=1,showexec,flush,uhelper=udisks) /dev/sdb2 on /media/dd5efb34-1d40-4e50-bbc2-a75d3e02af97 type ext3 (rw,nosuid,nodev,uhelper=udisks)
$ mount
/dev/sda3 on / type ext4 (rw,errors=remount-ro)
proc on /proc type proc (rw,noexec,nosuid,nodev)
sysfs on /sys type sysfs (rw,noexec,nosuid,nodev)
none on /sys/fs/fuse/connections type fusectl (rw)
none on /sys/kernel/debug type debugfs (rw)
none on /sys/kernel/security type securityfs (rw)
udev on /dev type devtmpfs (rw,mode=0755)
devpts on /dev/pts type devpts (rw,noexec,nosuid,gid=5,mode=0620)
tmpfs on /run type tmpfs (rw,noexec,nosuid,size=10%,mode=0755)
none on /run/lock type tmpfs (rw,noexec,nosuid,nodev,size=5242880)
none on /run/shm type tmpfs (rw,nosuid,nodev)
binfmt_misc on /proc/sys/fs/binfmt_misc type binfmt_misc (rw,noexec,nosuid,nodev)
rpc_pipefs on /run/rpc_pipefs type rpc_pipefs (rw)
nfsd on /proc/fs/nfsd type nfsd (rw)
none on /tmp/guest-zdrO76 type tmpfs (rw,mode=700)
gvfs-fuse-daemon on /var/lib/lightdm/.gvfs type fuse.gvfs-fuse-daemon (rw,nosuid,nodev,user=lightdm)
/dev/sdb1 on /media/raspberrypi type vfat (rw,nosuid,nodev,uid=136,gid=148,shortname=mixed,dmask=0077,utf8=1,showexec,flush,uhelper=udisks)
/dev/sdb2 on /media/dd5efb34-1d40-4e50-bbc2-a75d3e02af97 type ext3 (rw,nosuid,nodev,uhelper=udisks)


4. Repeat the below command to unmount all the mounted partition present on the SD card.

Plain text
Copy to clipboard
Open code in new window
EnlighterJS 3 Syntax Highlighter
$umount <partition-mountpoint>
Plain text
Copy to clipboard
Open code in new window
EnlighterJS 3 Syntax Highlighter
$ sudo umount /dev/sdb1
$ lsblk
NAME MAJ:MIN RM SIZE RO TYPE MOUNTPOINT
sda 8:0 0 931.5G 0 disk
├─sda1 8:1 0 350M 0 part
├─sda2 8:2 0 3G 0 part
├─sda3 8:3 0 896.4G 0 part /
├─sda4 8:4 0 1K 0 part
└─sda5 8:5 0 31.8G 0 part [SWAP]
sdb 8:16 1 14.9G 0 disk
├─sdb1 8:17 1 40M 0 part
└─sdb2 8:18 1 552M 0 part /media/dd5efb34-1d40-4e50-bbc2-a75d3e02af97
sr0 11:0 1 1024M 0 rom
$ sudo umount /dev/sdb2
$ lsblk
NAME MAJ:MIN RM SIZE RO TYPE MOUNTPOINT
sda 8:0 0 931.5G 0 disk
├─sda1 8:1 0 350M 0 part
├─sda2 8:2 0 3G 0 part
├─sda3 8:3 0 896.4G 0 part /
├─sda4 8:4 0 1K 0 part
└─sda5 8:5 0 31.8G 0 part [SWAP]
sdb 8:16 1 14.9G 0 disk
├─sdb1 8:17 1 40M 0 part
└─sdb2 8:18 1 552M 0 part
sr0 11:0 1 1024M 0 rom
$ sudo umount /dev/sdb1 $ lsblk NAME MAJ:MIN RM SIZE RO TYPE MOUNTPOINT sda 8:0 0 931.5G 0 disk ├─sda1 8:1 0 350M 0 part ├─sda2 8:2 0 3G 0 part ├─sda3 8:3 0 896.4G 0 part / ├─sda4 8:4 0 1K 0 part └─sda5 8:5 0 31.8G 0 part [SWAP] sdb 8:16 1 14.9G 0 disk ├─sdb1 8:17 1 40M 0 part └─sdb2 8:18 1 552M 0 part /media/dd5efb34-1d40-4e50-bbc2-a75d3e02af97 sr0 11:0 1 1024M 0 rom $ sudo umount /dev/sdb2 $ lsblk NAME MAJ:MIN RM SIZE RO TYPE MOUNTPOINT sda 8:0 0 931.5G 0 disk ├─sda1 8:1 0 350M 0 part ├─sda2 8:2 0 3G 0 part ├─sda3 8:3 0 896.4G 0 part / ├─sda4 8:4 0 1K 0 part └─sda5 8:5 0 31.8G 0 part [SWAP] sdb 8:16 1 14.9G 0 disk ├─sdb1 8:17 1 40M 0 part └─sdb2 8:18 1 552M 0 part sr0 11:0 1 1024M 0 rom
$ sudo umount /dev/sdb1
$ lsblk
NAME   MAJ:MIN RM   SIZE RO TYPE MOUNTPOINT
sda      8:0    0 931.5G  0 disk
├─sda1   8:1    0   350M  0 part
├─sda2   8:2    0     3G  0 part
├─sda3   8:3    0 896.4G  0 part /
├─sda4   8:4    0     1K  0 part
└─sda5   8:5    0  31.8G  0 part [SWAP]
sdb      8:16   1  14.9G  0 disk
├─sdb1   8:17   1    40M  0 part
└─sdb2   8:18   1   552M  0 part /media/dd5efb34-1d40-4e50-bbc2-a75d3e02af97
sr0     11:0    1  1024M  0 rom
$ sudo umount /dev/sdb2
$ lsblk
NAME   MAJ:MIN RM   SIZE RO TYPE MOUNTPOINT
sda      8:0    0 931.5G  0 disk
├─sda1   8:1    0   350M  0 part
├─sda2   8:2    0     3G  0 part
├─sda3   8:3    0 896.4G  0 part /
├─sda4   8:4    0     1K  0 part
└─sda5   8:5    0  31.8G  0 part [SWAP]
sdb      8:16   1  14.9G  0 disk
├─sdb1   8:17   1    40M  0 part
└─sdb2   8:18   1   552M  0 part
sr0     11:0    1  1024M  0 rom


5. Execute the following command to flash the image on the SD card.

Flash Command
Plain text
Copy to clipboard
Open code in new window
EnlighterJS 3 Syntax Highlighter
$sudo dd if=<path to ImageName.Rpi-sdimg> of=<path to SD card space> bs=4M
Example:
$sudo dd if=rdk-generic-mediaclient-wpe-image.Rpi-sdimg of=/dev/sdb bs=4M
149+0 records in
149+0 records out
624951296 bytes (625 MB) copied, 39.7752 s, 15.7 MB/s
$sudo dd if=<path to ImageName.Rpi-sdimg> of=<path to SD card space> bs=4M Example: $sudo dd if=rdk-generic-mediaclient-wpe-image.Rpi-sdimg of=/dev/sdb bs=4M 149+0 records in 149+0 records out 624951296 bytes (625 MB) copied, 39.7752 s, 15.7 MB/s
$sudo dd if=<path to ImageName.Rpi-sdimg> of=<path to SD card space> bs=4M
Example:
$sudo dd if=rdk-generic-mediaclient-wpe-image.Rpi-sdimg of=/dev/sdb bs=4M
149+0 records in
149+0 records out
624951296 bytes (625 MB) copied, 39.7752 s, 15.7 MB/s


6. Remove the SD card and insert it to the Raspberry Pi SD card slot.
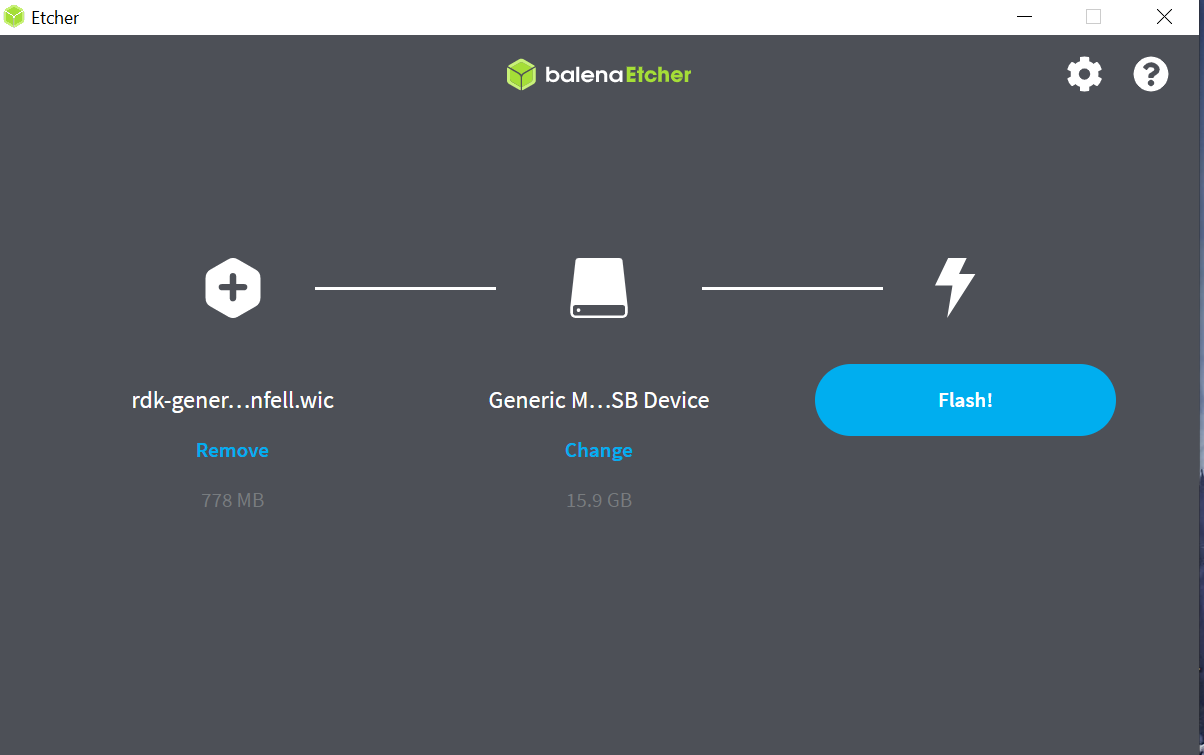
Using balenaEtcher

To flash the image on an SD card, you will need to download the balenaEtcher application-https://www.balena.io/etcher/ 

*Note: Prefer to use a 32GB sd card and there should be a minimum of 12GB of free space available in the device.
Be sure to remove all other portable flash drives/hard drives/SD cards from your computer before flashing the RDK image

  • Open the application → Select the image from your download folder → Select the drive containing your SD card → Click “Flash” to copy the image onto the SD card


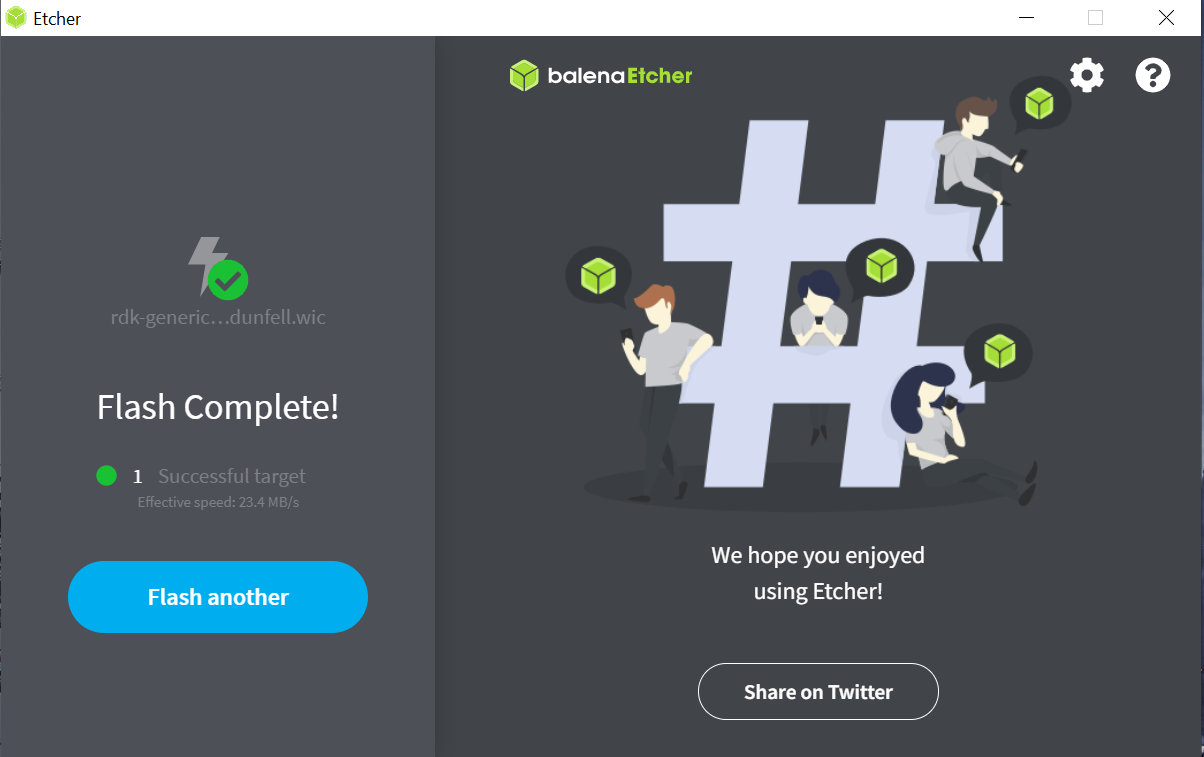
Once image flashing is done, remove the SD card from the device/laptop and i
nsert the SD card into the microSD card slot on the underside of your Raspberry Pi. 

Bring up and see UI

System Setup:

SetUpDiagram

Power on the RPI and Bring up the device.

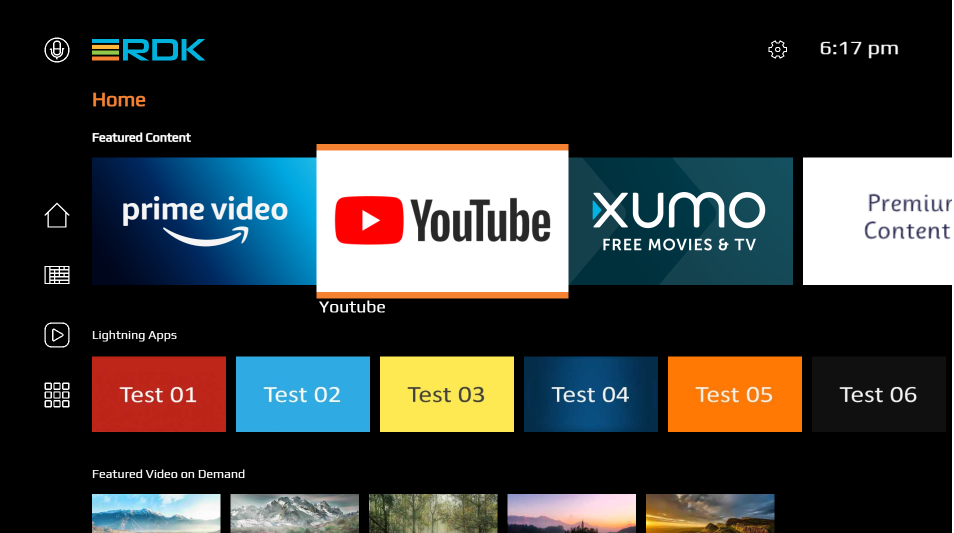
TV screen will display the default RDK UI as shown below.

How to navigate UI

  • Use Left/Right/Up/Down Keys to “move between the contents tiles”
  • Use Enter Key to “Navigate between settings screen”
  • Use backspace Key to “go back”

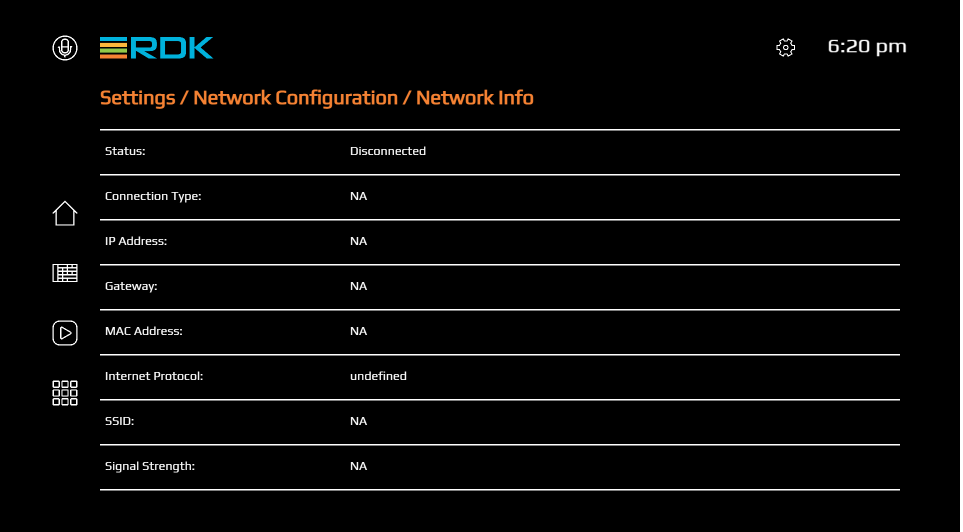
  • To view the Raspberry Pi’s IP address(referred as machineIP from now), Go to ‘Settings → Network Configurtion → Network Info → see for ‘IP Address”

Accessing Controller UI

  •  For connecting Controller UI, use URL: http://<RPi_IP>:9998

  • Plugins can be enabled or disabled from the controller UI. 

  • Wifi related services can be triggered from the Wi-Fi tab in the controller UI. We can scan and select from available networks.

  • For ssh, we can use ssh root@machineip

RDK Accelerator

You can also try out RDK’s Accelerator device. The RDK Video Accelerator is now available globally as the core RDK video application reference platform, providing the RDK community the ability to rapidly develop, test, and deliver innovative services.

Read more about the features and benefits of accelerator by referring this link

If you are not approved to use RDK Accelerator, go and sign up for preferred accelerator platform at https://rdkcentral.com/rdk-video-accelerator/ and reach out to RDK Support by sending an email to support@rdkcentral.com for further details.

.support{padding: 10px !important; position: relative;flex-direction: column!important;display: flex!important;margin-block-end:1rem!important; display: flex;border: 0.1px solid #d7d7d7;box-shadow: 4px 2px 2px 0 rgba(128, 128, 128, 30); border-radius:30;margin-bottom: 0.5rem;align-items: center;box-shadow: 2px 2px 6px 0 rgba(0, 0, 0, 0.1);background-color:#deebff; }
input[type][value] { background-image: none !important; background: none !important; }