
How to Contribute
Before You Contribute
In order to contribute code, first-time users are requested to agree to the license at wiki.rdkcentral. As an unaffiliated individual, you must sign the Contributor License Agreement (CLA). You can complete that process online.
What is a CLA?
The Contributor License Agreement is necessary mainly because you own the copyright to your changes, even after your contribution becomes part of our codebase, so we need your permission to use and distribute your code. We also need to be sure of various other things — for instance that you‘ll tell us if you know that your code infringes on other people’s patents.
You don‘t have to sign the CLA until after you’ve submitted your code for review and a member has approved it, but you must do it before we can put your code into our codebase. Before you start working on a larger contribution, get in touch with us to discuss your idea so that we can help out and possibly guide you. Early coordination makes it much easier to avoid frustration later on.
Code Reviews
All submissions, including submissions by project members, require review. We use both Gerrit (Gerrit Code Review) and Github (Github Code Review) depending on where the repo is hosted. Currently, team-member submissions are reviewed privately, and external submissions go through public reviews.
Code Submission Process
The following steps explain the submission process:
- Ensure you or your company have signed the appropriate CLA as discussed in the Before You Contribute section above.
- Rebase your changes down into a single git commit.
- Run
git push commandto upload the review to code.rdkcentral. - Someone from the maintainers team reviews the code, adding comments on any things that need to change before the code can be submitted.
- If you need to make changes, make them locally, test them, then
git commit --amendto add them to the existing commit. Then return to step 2. - If you do not need to make any more changes, a maintainer integrates the change into our private repository, and it is pushed out to the public repository after some time.
Contributor License Agreement (CLA) – RDK Central Github
The RDK CLA facilitates the acceptance and sharing of RDK contributions within the community.
When you contribute to an RDK open source project on GitHub via a new pull request, a bot will evaluate whether you have signed the CLA. The bot will comment on the pull request, including a link to accept the agreement.
CLA assistant enables contributors to sign CLAs from within a pull request. The CLA is stored as a GitHub Gist file and linked with the repository/organization in CLA assistant.
CLA assistant
- Comments on each opened pull request to ask the contributor to sign the CLA.
- Allows contributors to sign a CLA from within a pull request.
- Authenticates the signee with his or her GitHub account.
- Updates the status of a pull request when the contributor agrees to the CLA.
- Automatically asks users to re-sign the CLA for each new pull request in the event the associated Gist & CLA has changed.
- Repository owners can review a list of users who signed the CLA for each version of it.
Note – CLA assistant is provided by SAP as a free hosted offering under: cla-assistant.io
Code Contribution Process
Code Contribution Workflow
The Code Contribution Workflow is designed to facilitate community involvement in the development of RDK components. The structured process ensures that contributions are reviewed, validated and integrated effectively, maintaining high standards of quality throughout.
Branch Overview
-
Product Branch:
- The Product Branch is a deployment-ready branch where the community submits changes for review. This branch serves as the main integration point for code that meets rigorous testing qualifications.
- For more information on the components hosted in the product branch, refer to the CMF Gerrit and the RDK Central GitHub repository.
-
Monthly Sprint Branch (rdk-dev-yymm):
- Created monthly as a new CMF integration branch, this branch is based on the product branch.
- It is hosted per repository and aims to incorporate community changes as early as possible.
- Once community changes are approved, they will be cherry-picked to the monthly sprint branch, making them available before the final down-streaming to the regression branch.
-
Regression Branch:
- This branch is used for validating contributions.
- Approved changes are down-streamed here for pre-deployment validation through the established testing process.
- Defects and features will be planned in monthly sprints, with timelines published to contributors.
- Contributions pending validation will be available in monthly development iteration branches.
Contribution Process
- Users will make code contributions to the rdk-next branch. This process includes:
- Code reviews
- Build verification
- License compliance scans
- Test validation
- Once the changes are successfully validated, changes are cherry-picked to the monthly sprint branch (rdk-dev-yymm).
- These changes are then down-streamed to the regression branch for further pre-deployment testing.
- After successful validation, the changes are cherry-picked to the product branch, completing the integration into the main deployment-ready branch.

Component owners/reviewers/approvers, defined as specific groups in Gerrit, will be added to the review by default. You may request additional feedback by specifically adding reviewers via the Gerrit web GUI.
Development Workflow
This section describes the general RDK development work-flow and related topics. The general pattern for successfully accepting a change is as follows:
- Discuss on mailing list to get general consensus about approach.
- Pull latest code.
- Build on your supported platform.
- Develop features or fix bugs following RDK Coding standards.
- Submit to Gerrit for review.
- Review and respond to reviewer comments.
- Change accepted and merged.
For a detailed step by step description, please refer: Gerrit Development Workflow.
Code Management Facility (CMF)
On a periodic basis, RDK code is tested and released to the community as CMF releases. This will be generic RDK code without dependency to any platform. CMF code can be built for raspberry-pi or can be ported to a specific platform (RDK Porting). And once the component owner approves this change, it will be available to the community in RDK central.
CMF Contributions
While working with CMF stack, one might find ways to enhance RDK code by adding new features or bug fixes as RDK contribution. The general CMF contribution workflow is as follows:

Detailed information on contributing code changes to RDK can be found here: Code Management Documentation
Getting Support
Support tickets can be raised to get request support from RDK Community Support team. This can be for the bugs you face, doubts you have or any code contributions which you think might enhance RDK. RDK Support ticket can be raised here: support@rdkcentral.
JIRA Guidelines
Where to Create a JIRA ticket
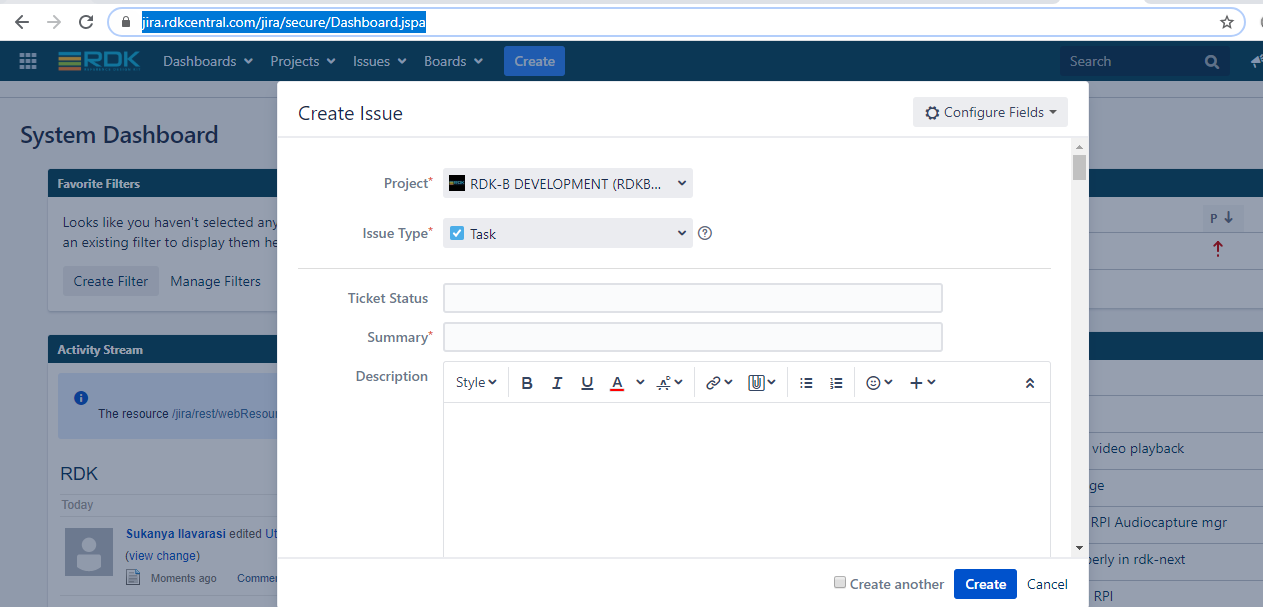
- Log in to JIRA jira.rdkcentral using rdkcentral credentials
- Create a JIRA ticket under RDKDEV (for Video) or RDKBDEV (for Broadband).
- Click on the Create button
A Snap shot for how to create a JIRA.
JIRA Guideline for Patches Contributions
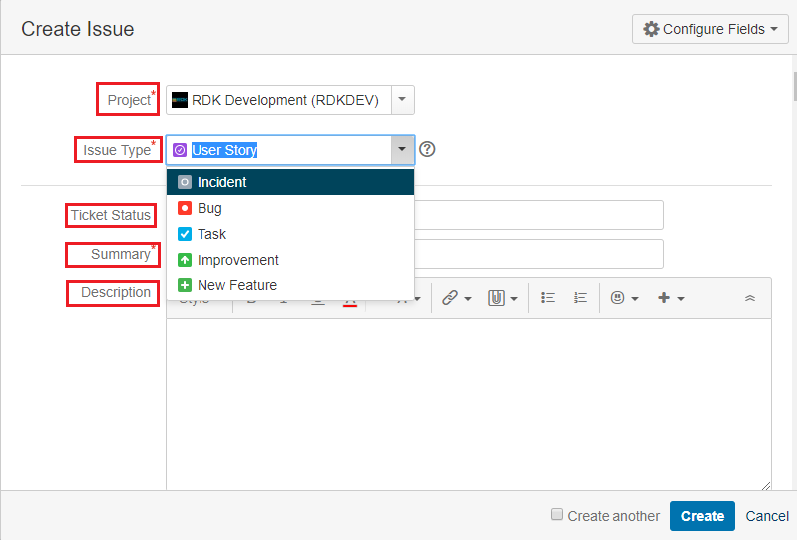
Issue type corresponds to the type of contributions we are making. The following issue types can be possible for patches contribution
√ Incident – Build failure incident issues with the code verification steps such as Black duck scan, Jenkins verification etc.
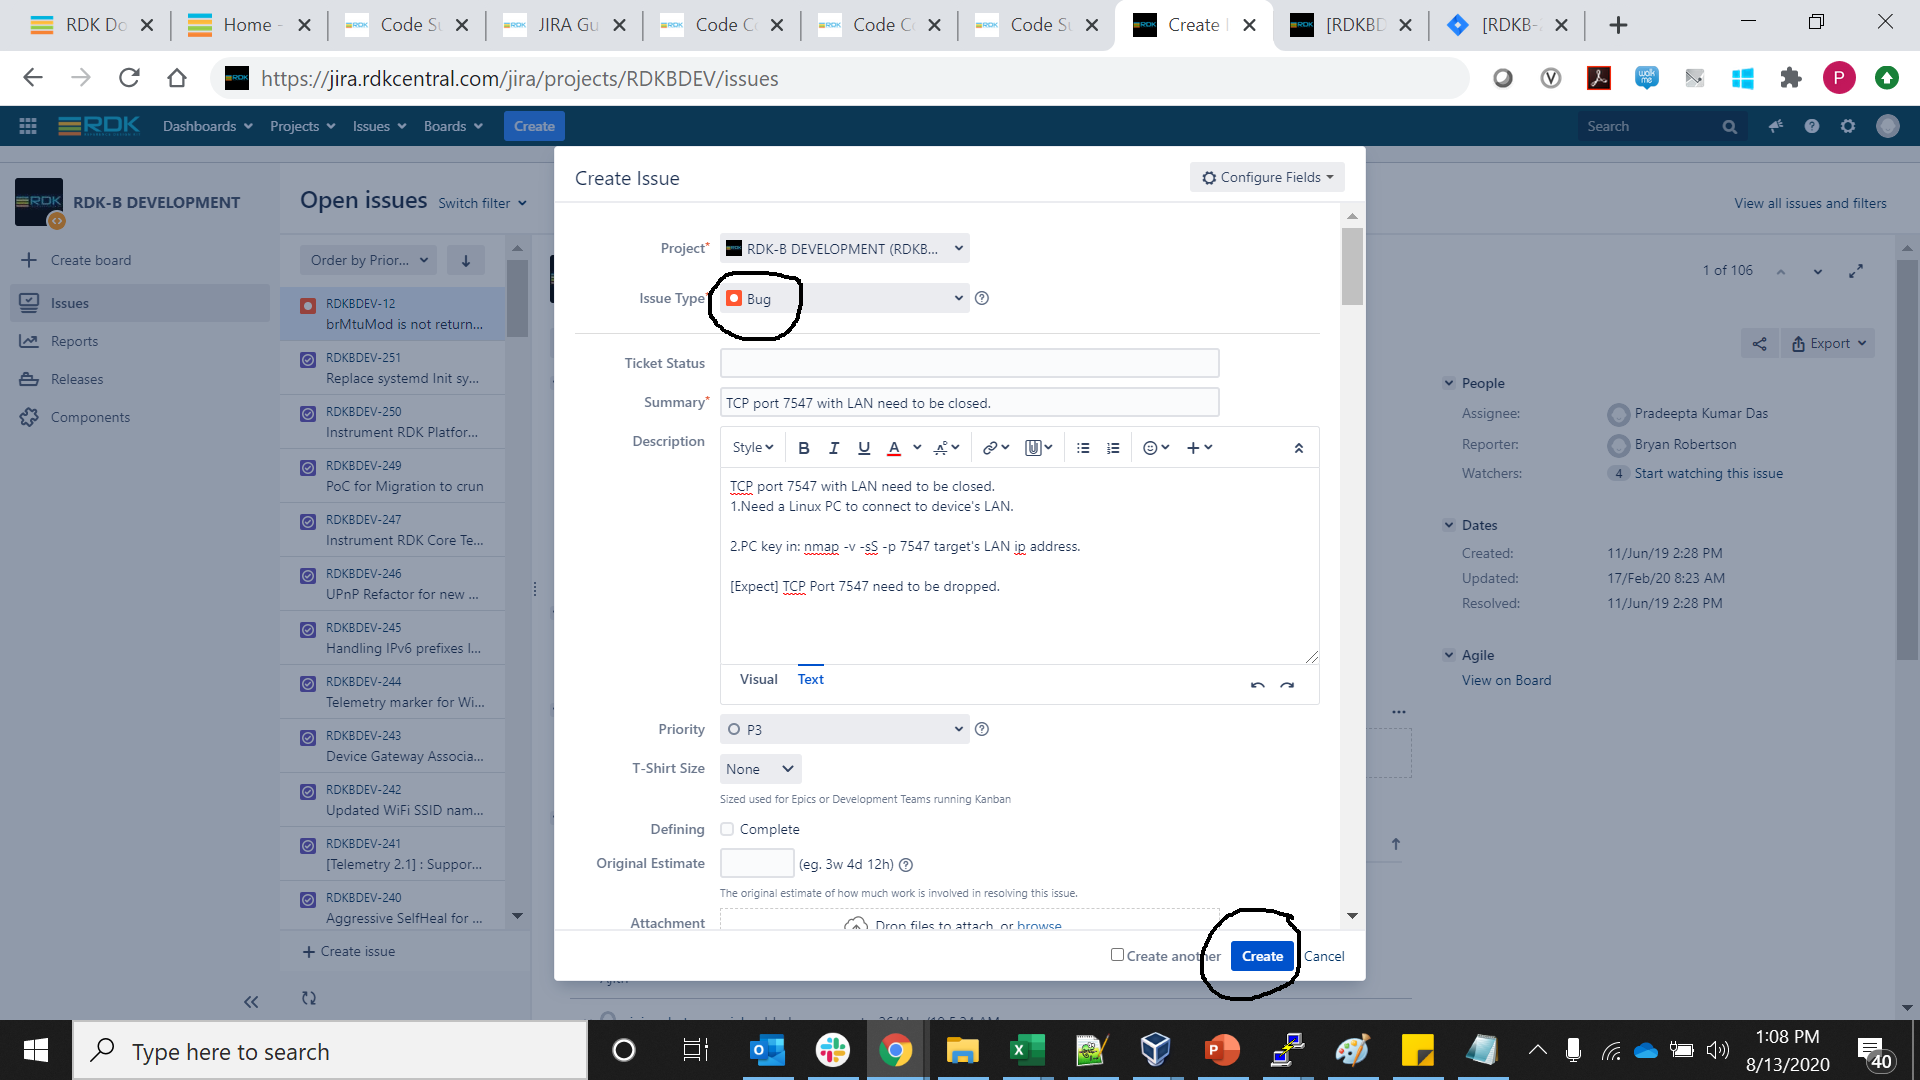
√ Bug – Bugs in existing component code. To report a bug, users must create a ticket with type Bug and provide as much information as possible, including:
- A clear and concise description of the bug
- Steps to reproduce the bug
- The expected behavior
- The actual behavior
- Any relevant screenshots, logs or videos
√ Task – An individual task which may be part of enhancement of existing feature, etc.
√ Improvement – Improvements such as code refactoring or enhancements in current code.
Summary and Descriptions are mandatory fields need to be filled.
Click on Create button to Create a new JIRA. Sample example is provided below.
Note: To know more about how to refresh the patches click here.
JIRA Guideline for New Feature Contribution
A feature contribution should follow after creating an appropriate JIRA project. This will present a clear picture about the architecture, testing details and other information which will be helpful during the acceptance process of the contribution.
Mandatory information
-
Project
For Video & build system (Yocto) related contributions, the ticket should be created under RDKDEV. For broadband, the ticket should be created under RDKBDEV project.
-
Issue Type
√ New feature – New feature contributions.
-
Ticket Status
Status should be initially Open, and transitioned to the appropriate value while the contribution is being worked on.
-
Summary
A brief summary about what we are trying to contribute -
Description
A descriptive information about the contribution should be present so that component developers & architecture team can do assessment of the feature. Below details are desirable if the contribution is a new feature or having an significant impact on the current architecture.
Brief introduction on what the current system lacks & what needs to be done:

1. Individual task/highlighted point #1 brief description.
2. Individual task/highlighted point #2 brief description.
The following items should be considered/addressed in the documentation for any RDK design initiative
JIRA Update Checklist
-----------------------
The following JIRA fields MUST be filled in to be considered "Definition Complete":
* RDK SoC, RDK OEM - populate these fields for any user story where we have dependency on OEM and/or SoC to perform work in the completion of this user story. Select all that apply, or “None” if there is no dependency.
* OEM/SoC Impact Details - description of impact (or "see Solution Overview" if included in the architecture specification)
* Platforms - ensure correct list of devices
* Validation - type of testing
* Regression - is regression required?
* Dependency - Internal/External
* Description - Solution Overview and Architecture Checklist

Testing impact/Guidance
------------------------
* Impacted modules
* Test process

Automated Testing
------------------
* Automation test procedure.

Diagnostics, Telemetry and Logging
-----------------------------------
* N/A

Considerations for adding or modifying TR-181 parameters:
---------------------------------------------------------
* Document any addition or modifications made to tr-181 parameters

Outbound Network Connections
------------------------------
* Does this component make outbound connection requests?
* If yes, do the connection requests retry in the case of failure?
** Do the repeated requests use an exponential back-off?
** If a maximum back-off has been defined, is it greater than 10 minutes?

Security
----------
* For Security Review - Do feature elements:
** make any changes to network port assignments?
** change iptables rules?
** require credentials, passwords, secret data?
** make any changes to our network connections?
** connect to new services or servers?
** use data input from users or external tools?
** use any cryptographic functions?
** create or disclose proprietary or sensitive Co. or device data?
** properly log operational and configuration changes?
** If possible describe what could happen if feature elements are:
*** spoofed?
*** tampered with?
*** used by an unauthorized actor?
** Advanced questions (optional)
*** what happens if a record of actions taken is destroyed?
*** what happens if an attacker attempts to DOS with the feature?

SI Concerns
-------------
* Yes/No/Any

Performance expectations
-------------------------
* Yes/No/Any


Timing consideration
----------------------
* If Any.
Supplementary Information
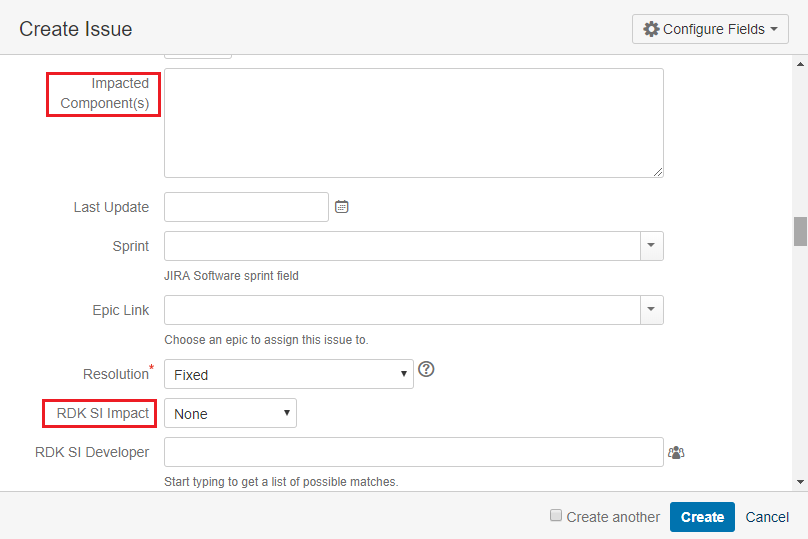
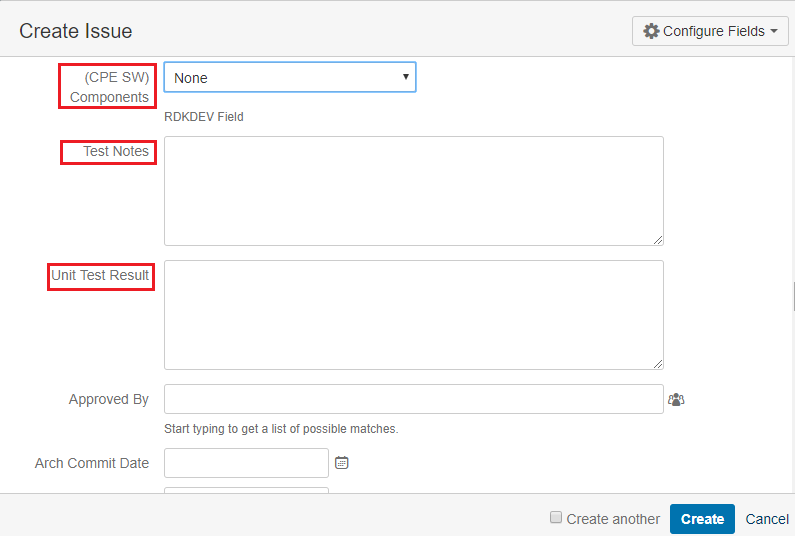
- Impacted component(s) – Fill in list of impacted RDK components
- RDK SI Impact – System Integration impacts
- CPE SW Components – Component names.
- Test Notes – Describe what tests are performed to validate this contribution and the procedure.
- Unit Test Result – Description.
Code Submission Process – RDK Central Gerrit
In order to contribute code, first-time users are requested to agree to the license at wiki.rdkcentral.
RDK components are hosted at code.rdkcentral. You can submit your code changes for review via that site using the workflow outlined below.
Create a JIRA ticket
- Refer to JIRA Guidelines for creating a JIRA before pushing your code changes in rdkcentral.
Clone the Repository
Clone the component repository from the Gerrit server code.rdkcentral into a local workspace
Clone with commit-msg hook (to add Change-ID footer to commit messages)
git clone https://code.rdkcentral.com/r/<component-name> <component-name> -b <branch-name>
cd <component-name>
gitdir=$(git rev-parse --git-dir); curl -o ${gitdir}/hooks/commit-msg https://code.rdkcentral.com/r/tools/hooks/commit-msg ; chmod +x ${gitdir}/hooks/commit-msg
Click here to find the details about <component-name> & <branch-name> for code submission.
Note: The commit-msg hook is installed in the local Git repository and is a prerequisite for Gerrit to accept commits. The inclusion of the unique Change-ID in the commit message allows Gerrit to automatically associate a new version of a change back to its original review.
Note: You may need to configure your Git identity on the cloned repository. The email address that your local Git uses should match the email address listed in Gerrit.
- Cloning the code before login once to rdkcentral, user would get the Authentication error, even though the account is in good standing and has all the required access.
- Please login to rdkcentral before attempting to clone.
Example commands to run are as follows:
$ git config user.name "John Doe"

$ git config user.email "john.doe@example.org"
Work on the change, commit to local clone
Each commit constitutes a change in Gerrit and must be approved separately. It is recommended to squash several commits into one that represents a change to the project.
If necessary, it is possible to squash a series of commits into a single commit before publishing them, using interactive rebase:
$ git rebase --interactive
It is important to preserve the Change-Id line when editing and there should only be one “pick” entry at the end of this process. The end result is to submit one change to Gerrit.
Push the new changes for Gerrit for review
Commits will be BLOCKED if the format of the commit message does not comply with the standard. You will see a warning as to why the commit was blocked.
Mandatory Information in Commit Message
- Associated JIRA ticket (Following the Guideline to create a JIRA)
- Reason for change information
- Test procedure by which change can be verified
- Possible risks of failure
$ git commit --amend
<Add your commit message in below format>
<JIRA TICKET #1>, <JIRA TICKET #2>, <JIRA TICKET #n> : <one line summary of change>
<empty line>
Reason for change: <explanation of change>
Test Procedure: < test procedure>
Risks: <side effects and other considerations> [Note: state None if there are no other considerations]
<empty line>
Signed-off-by: Your Name <your_name@email.com>
Submit your code changes for review
$ git push origin HEAD:refs/for/<branch>
When interfacing with Gerrit you push to a virtual branch /refs/for/<branch>, representing “code review before submission to branch”. Gerrit will subsequently assign a unique URL for the change, to facilitate access and review via the web UI.
Notes:
- HEAD is a Git symbolic reference to the most recent commit on the current branch. When you change branches, HEAD is updated to refer to the new branch’s latest commit.
- The refspec in the git push operation takes the form source:destination (source is the local ref being pushed, destination is the remote ref being updated).
Review notifications and addition of new reviewers
Component owners/reviewers/approvers, defined as specific groups in Gerrit, will be added to the review by default. You may request additional feedback by specifically adding reviewers via the Gerrit web GUI.
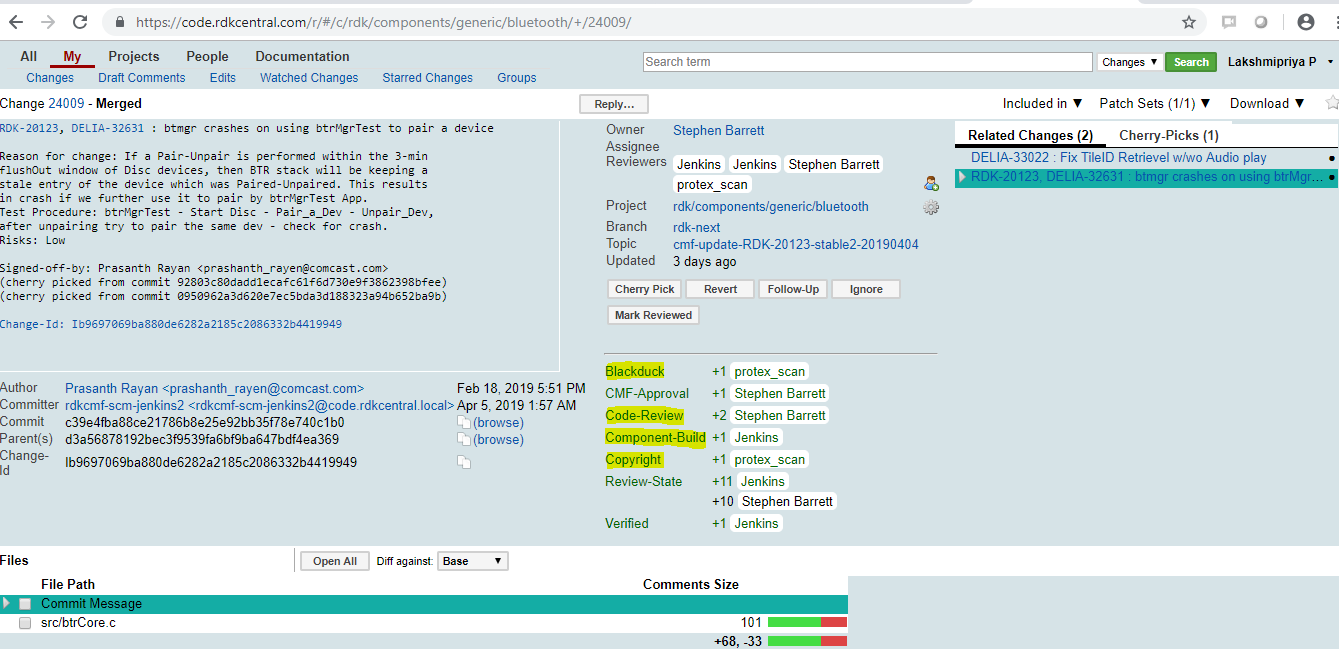
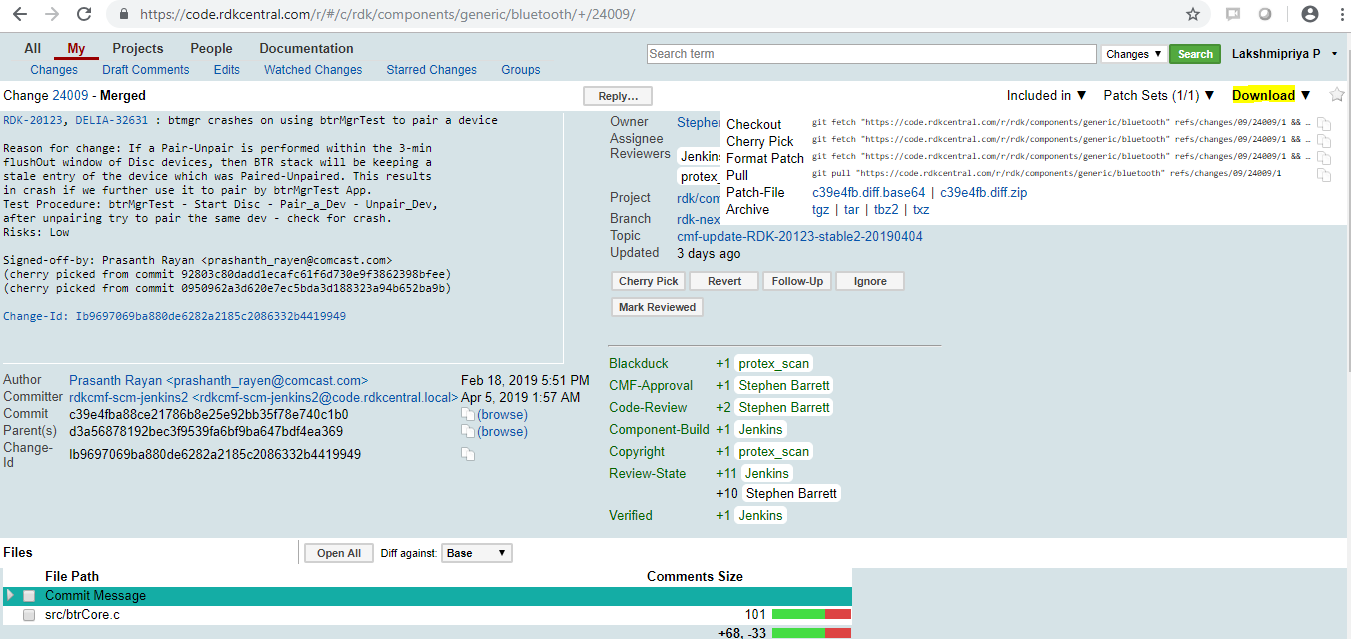
Scan and build on code submission
BlackDuck, copyright scanning and build jobs will be triggered automatically from CMF Jenkins. The output of these jobs is integrated into the Gerrit voting process via custom labels and will reflect any ‘red flag’ in a file that has new code changes, whether introduced in the new change/patch-set or not. Scans will post any findings as comments in the Gerrit review. Build jobs also do that, but in addition will upload the build log to the corresponding JIRA ticket (if there is one) as an attachment.
Code review and scoring process
Reviewers can comment on and score a given change.
The default set of rules for enabling a code change for submission requires:
- a Code Review score of +2; this can only be provided by the component owner or an admin;
- +1 score on any mandatory Gerrit labels configured for the project.
The result of the scoring process and validation rules is to enable the Submit action on the Gerrit Web UI and subsequent merge capability to the target branch.
Label: Code Review (Highlighted in yellow color) For a change to be mergeable, the latest patch set must have a ‘+2’ value approval in this category or label, and no ‘-2 Do not submit’. Thus -2 on any patch set can block a submit, while +2 on the latest patch set enables it for merging.
Labels: Blackduck/Copyright/Component-Build (Highlighted in yellow color) For a change to be mergeable, the change must have a ‘+1’ score on these labels, and no ‘-1 Fails’. Thus, ‘-1 Fails’ can block a submit, while ‘+1’ enables a submit.
Submit code change
Only authorized users, i.e. component owners, component approvers or admins, can submit the change allowing Gerrit to merge it to the target branch as soon as possible. A change can be submitted, having satisfied the approval conditions described earlier, by clicking the ‘Submit Patch Set n’ button within the Gerrit UI. When a change has been Submitted, it is automatically merged to the target branch by Gerrit.
Abandon change
Depending on the review outcome, it might be decided to abandon the change. The component owner or an authorised user may abandon the change by clicking the “Abandon Change” button. The abandoned changes are not removed from the Gerrit database and can be restored at a later stage.
Submitted, Merge Pending
If a change depends on another change that is still in review, it will enter this state. It will be merged automatically by Gerrit once all its dependencies are submitted and merged.
Change needs to be reworked
If you need to rework a change, you need to push another commit with the same Change-ID as the original in its commit message.
This is the mechanism Gerrit uses to associate or link the two items. The `–amend` option to the Git commit command prevents a new Change-ID being generated by the commit-msg hook.
The basic steps are outlined below.
First, fetch the change. If you still have the checkout that was used to push the original change, you can skip this step.
$ git fetch https://user@code.rdkcentral.com/r/component1 refs/changes/02/2/1 && git checkout FETCH_HEAD
where the numbering scheme for fetching the changes is as follows:
refs/changes/<last two digits of change number> <change number> <patch set number>
Next, make any necessary source changes, and do:
$ git commit --amend
$ git push origin HEAD:refs/for/<branch>
A new patch set is now appended to the Gerrit review item, and this will go through the same review process as before.
- The ‘change number’ referenced above is different to underlying Git commit ID.
- Patch-sets are numbered (starting from 1) for each review, and incremented whenever a change is amended with another Git commit.
- FETCH_HEAD is a Git symbolic reference and shorthand for the head of the last branch fetched and is valid only immediately after the fetch operation.
Gerrit merge failure as a result of a conflict
Essentially this means that the remote branch has evolved since this change was started and now software conflicts with changes in the remote branch. The developer must resolve the merge conflicts in their local clone and then push another patch-set.
The process is resumed at step 4, with the important distinction of committing with the –amend option, once the developer pulls the latest changes. Note: A summary of the steps involved, assuming the local branch still exists:
Rebase the local branch to the latest state of origin/<branch>;Resolve all conflicts; Commit with the `–amend` option; Push changes to Gerrit for review. After this change a new patch set is created for the change.
Note: If the local branch no longer exists, the steps are as follows:
$ git fetch https://user@code.rdkcentral.com/r/rdk_component_1 refs/changes/58/58/2 && git checkout FETCH_HEAD
$ git rebase origin/<branch>
[Edit the conflicting file, cleaning up the <<<<, ==== >>> markers surrounding the conflicting lines]
$ git add <file>
$ git commit --amend
$ git push origin HEAD:refs/for/<branch>
RDK Components – Product Branch
Following RDK components are hosted at code.rdkcentral. Follow the Instructions to submit your code changes.
Example of how to use git clone for meta-rdk-ext component: git clone https://code.rdkcentral.com/r/plugins/gitiles/rdk/components/generic/rdk-oe/meta-rdk-ext -b rdk-next
List of open-sourced and licensed repositories hosted in RDK central gerrit can be found from Source Code Repositories.
Code Submission Process – RDK Central GitHub
Introduction
GitHub is a Git repository hosting service, but it adds many of its own features. While Git is a command line tool, GitHub provides a Web-based graphical interface.
GitHub Enterprise is the on-premises version of GitHub and is available on VMware, AWS, and OpenStack KVM, on your own servers or in a private cloud. GitHub Enterprise operates on your infrastructure with your existing information security controls from firewalls and VPNs, to IAM and monitoring systems.
CMF GitHub Organizations
There is one primary RDKM Code Management organizations, namely RDKcentral. This organization hosts the open-source repositories for projects pertaining to RDK-V, RDK-B and RDK-C profiles.
RDK Central GitHub Components
Please refer to this link to see all the repositories Source Code Repositories.
GitHub Pull Requests
Pull requests let you tell others about changes you’ve pushed to a branch in a repository on GitHub. Once a pull request is opened, you can review the potential changes with collaborators and add follow-up commits before your changes are merged into the base branch. Anyone with read permissions to a repository can create a pull request, but you must have write permissions to create a branch. If you want to create a new branch for your pull request and don’t have write permissions to the repository, you can fork the repository first. Pull requests can only be opened between two branches that are different.
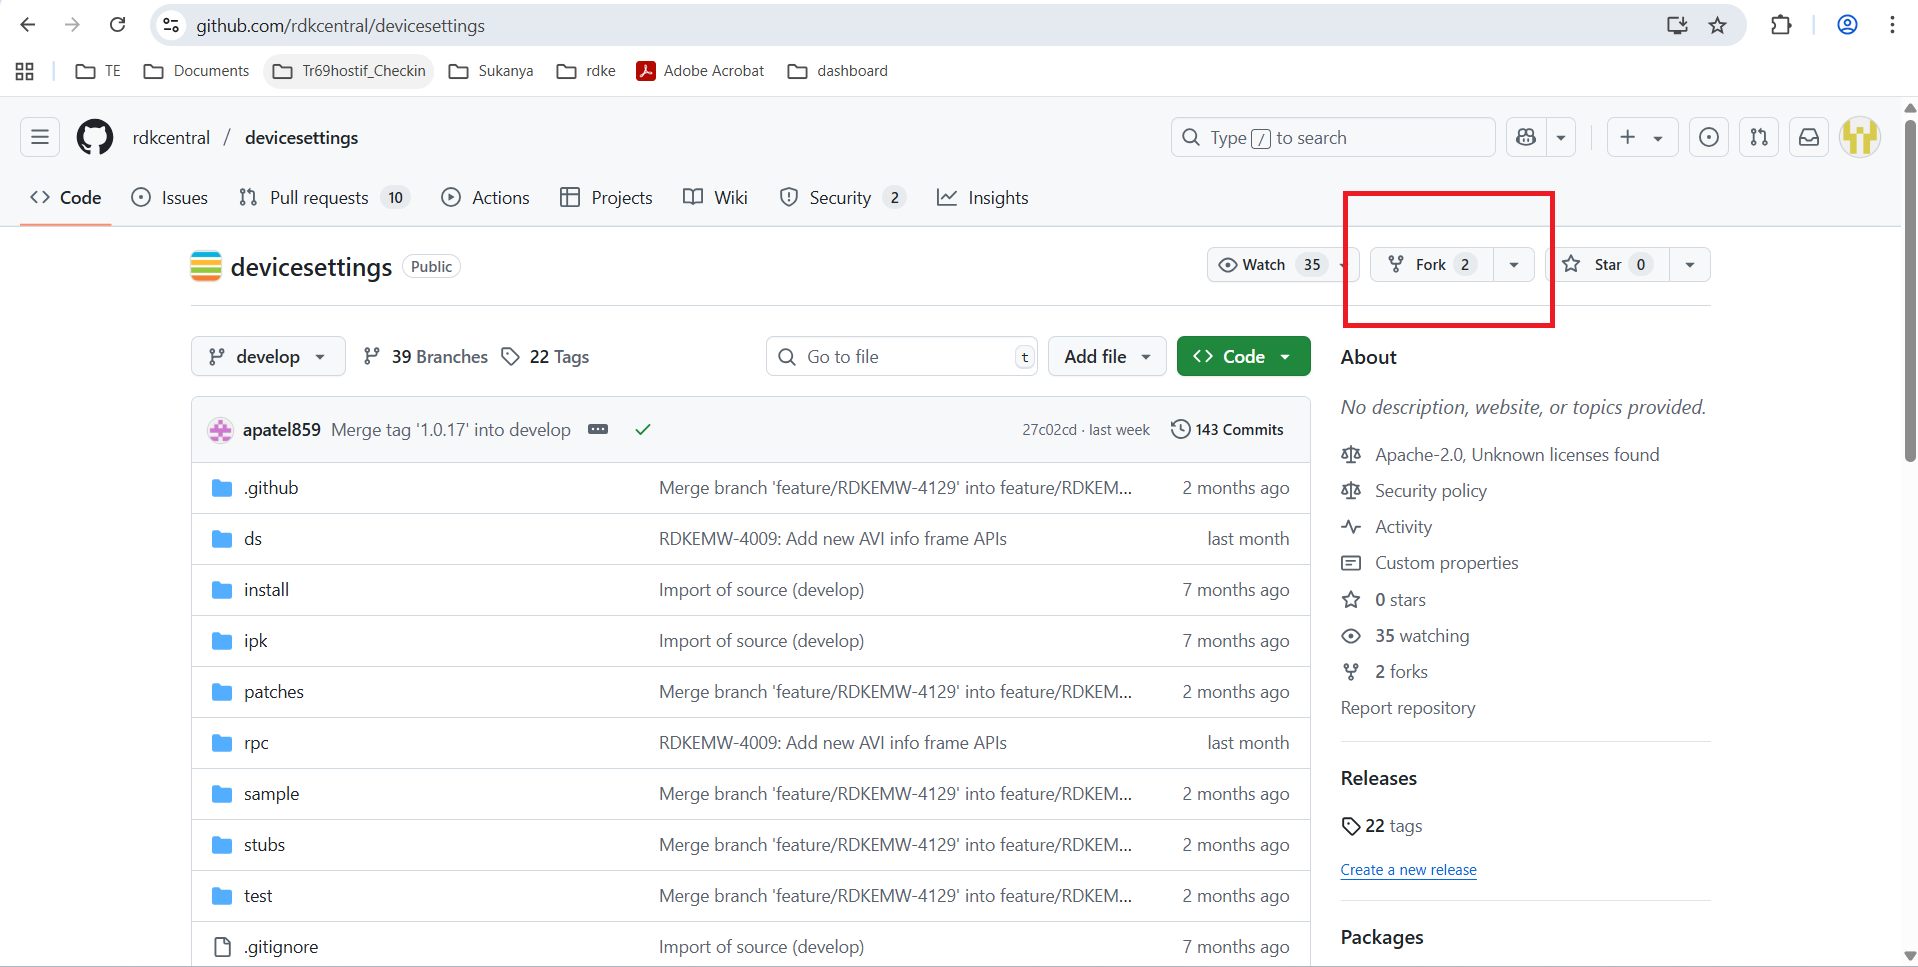
GitHub Fork
A ‘fork’ is a personal copy of another user’s repository that lives on your GitHub account. Forks allow you to freely make changes to a project without affecting the original. A forked project also remains attached to the original, allowing you to submit a pull request to the original’s author to update with your changes, ensuring you’re always working off a recent or up-to-date codebase.
GitHub Workflow Steps
- Create a Fork by simply clicking on the ‘fork’ button of the repository page on GitHub.
- Clone your Fork, the clone command creates a local git repository from your remote fork on GitHub.
- Modify the Code in your local clone and commit the changes to your local clone using the git commit command.
- Push your Changes by invoking the git push command, from your workspace, to upload your changes to your remote fork on GitHub.
- Create a Pull Request by clicking the ‘pull request’ button on the GitHub page of your remote fork.
Configure your Github access token
In the recent past support for direct password authentication was removed from Github. You will need to generate a Github personal token to push your code changes RDK Central Github.
To create your personal token, you have to go to github.com -> Settings -> Developer Settings -> Personal Access Token -> Generate New Token.
Note – While creating a new token, it will ask for Github configuration options selection – Select everything.
Once the Github token is generated successfull, you will need to add an entry an entry to the ~/.netrc file OR you can directly use this token as your Github password in the command line to push the code changes.
Example: how to add Github credential on ~/.netrc file
machine github.com login your-github-handle-name password ghp_BCy09kNYxg82no6OnliSJQVngGi9K1234567
GitHub Protected Branches
Protected branches ensure that collaborators on your repository cannot make irrevocable changes to branches. Enabling protected branches also allows you to enable other optional checks and requirements, like required status checks and required reviews.
A custom CMF branch protection scheme is deployed in each repository in order to enforce the desired workflows. This scheme imposes the following rules:
- Require pull request reviews before merging
- Require status checks to pass before merging
- blackduck
- copyright
- license/cla
- component-build
Required status checks ensure that all required CI tests are passing before collaborators can make changes to a protected branch. Status checks are based on external processes, such as continuous integration builds, code compliance scanning, which run for each push you make to a repository. You can see the pending, passing, or failing state of status checks next to individual commits in your pull request.
Contributor License Agreement (CLA)
The RDK CLA facilitates the acceptance and sharing of RDK contributions within the community.
When you contribute to an RDK open source project on GitHub via a new pull request, a bot will evaluate whether you have signed the CLA. The bot will comment on the pull request, including a link to accept the agreement.
CLA assistant enables contributors to sign CLAs from within a pull request. The CLA is stored as a GitHub Gist file and linked with the repository/organization in CLA assistant.
CLA assistant:
- Comments on each opened pull request to ask the contributor to sign the CLA
- Allows contributors to sign a CLA from within a pull request
- Authenticates the signee with his or her GitHub account
- Updates the status of a pull request when the contributor agrees to the CLA
- Automatically asks users to re-sign the CLA for each new pull request in the event the associated Gist & CLA has changed
- Repository owners can review a list of users who signed the CLA for each version of it.
Note – CLA assistant is provided by SAP as a free hosted offering under: cla-assistant.io
Compliance Scanning
CMF uses BlackDuck (Protex) to check incoming contributions for license compliance. BlackDuck is normally a very manual tool but a significant level of automation has been developed by the team to reduce manual intervention, but it still requires a human to oversee it.
Compliance scanning is looking for several things:
- Addition of source code with a conflicting license (e.g. LGPL code in an Apache component).
- Modification of an opensource component with code of a conflicting license.
- Incorrect or proprietary copyright attribution.
The key points are as follows:
- Scan contribution in GitHub Pull Request.
- Scan is automatically triggered by a webhook.
- Results in scan of the contribution only, i.e. only the changes.
- Required Status Check, associated with the Blackduck scan is updated.
- Summary of the scan including any code matches are provided via a link to an associated Gist.
OSS Engineer and interested parties are notified of scan failures (violations, pending identifications or reviews etc) via AWS Mailing list and Slack.
git-secrets Scanning
git-secrets is a tool created by AWS Labs that scans commits and commit messages and aims to prevent passwords and other sensitive information being committed to a git repository. The tool can also scan files or folders to look for secrets such as an AWS Access Key ID and AWS Secret Access Keys in a repository. git-secrets scans commits, commit messages, and merge commits to prevent adding secrets into your git repositories. If a commit, commit message, or any commit in merge history matches one of the configured prohibited regular expression patterns, then the commit is rejected.
Example of how to push the code changes
Step 1: Fork the component from GitHub
Sign-in to GitHub with your own credentials.
Search for the Component.
Fork the component from GitHub. Forking will create a copy (i.e., your own WORKSPACE) of an original component to work.
Step 2: Creating a new Branch
From the file tree view on the left, select the branch dropdown menu, In the “Find or create a branch…” text field, type a unique name for your new branch, then click Create branch.

Step 3: Clone the Component with new branch
Click on the “Clone or download” button to get the clone URL from GitHub. Ensure your GitHub username present in the URL to start work with your own workspace.
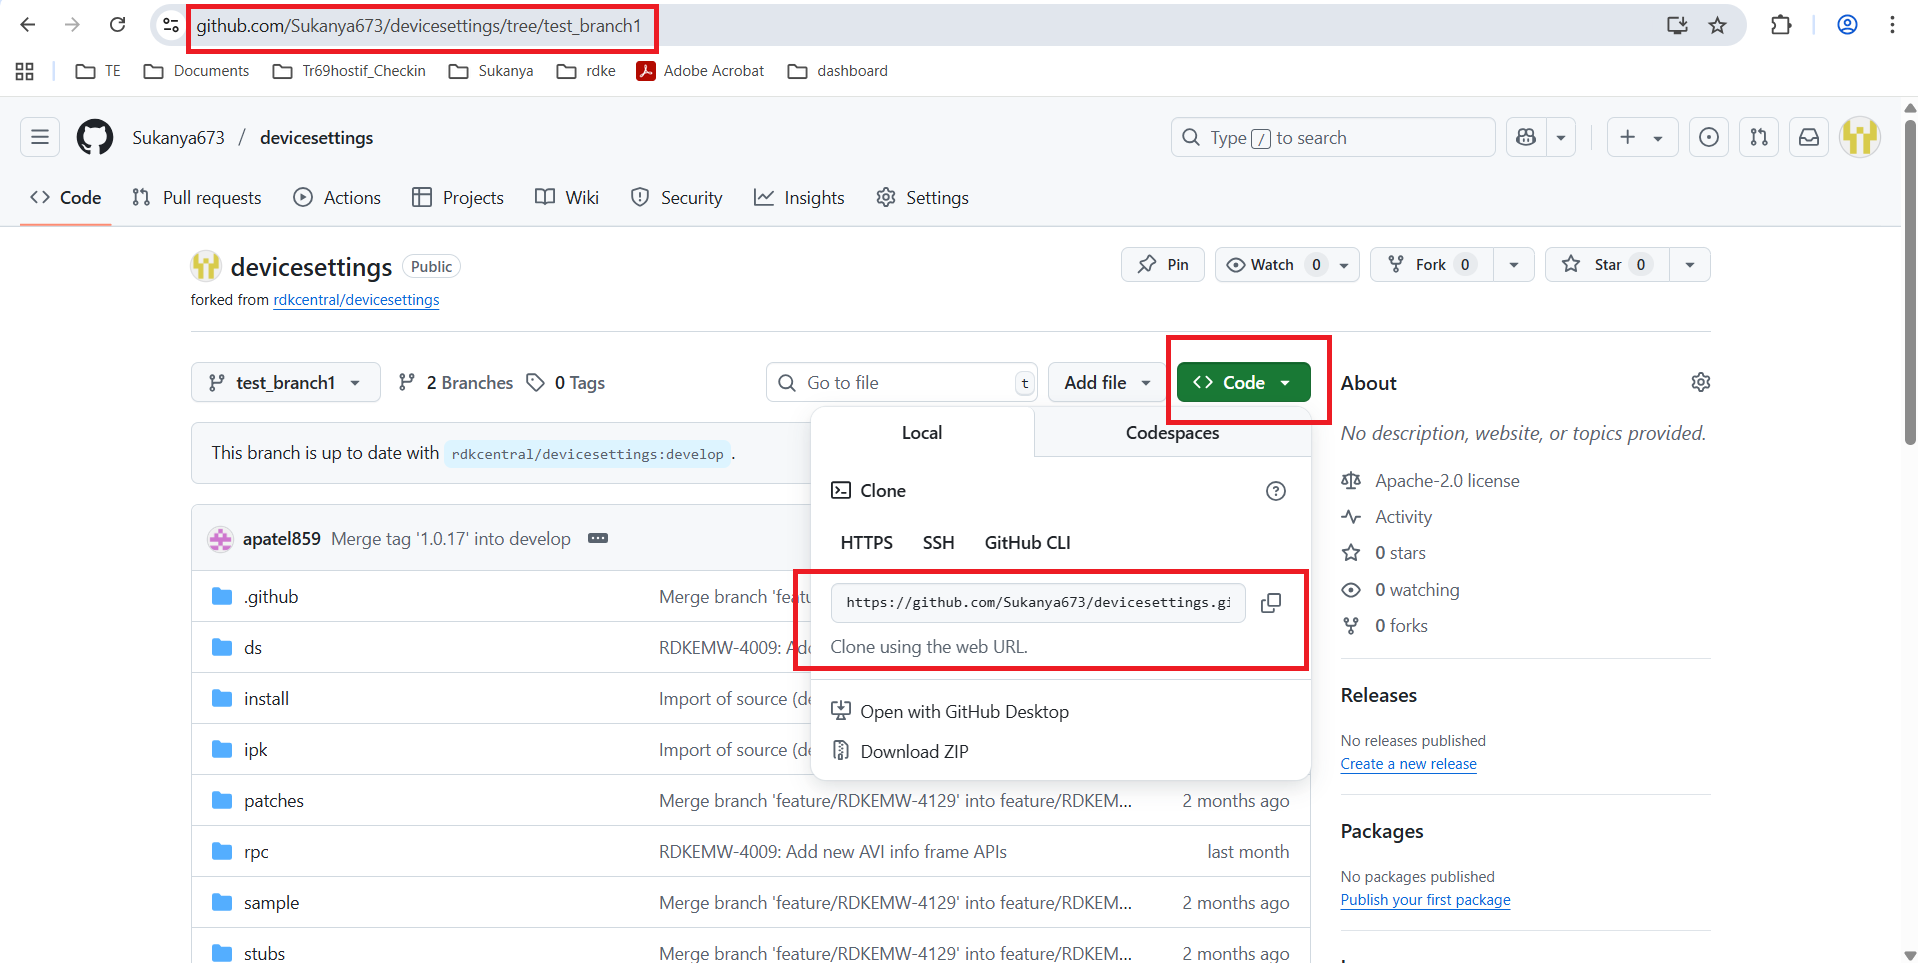
abcd123@dvm-yocto4-docker-abcd123:~/builds/ds_test$ git clone https://github.com/Sukanya673/devicesettings.git -b test_branch1
Cloning into '.'...
remote: Enumerating objects: 736, done.
remote: Counting objects: 100% (166/166), done.
remote: Compressing objects: 100% (73/73), done.
remote: Total 736 (delta 126), reused 95 (delta 93), pack-reused 570 (from 2)
Receiving objects: 100% (736/736), 465.61 KiB | 6.95 MiB/s, done.
Resolving deltas: 100% (465/465), done.
abcd123@dvm-yocto4-docker-abcd123:~/builds/ds_test$
Step 4: Work on changes and Gerrit commands to push the changes
Make the code changes, and commit the changes
|
git clone https://github.com/Sukanya673/devicesettings.git -b test_branch1 Modify your code. $ git status $ git push After submitting your changes, follow the next step to create a PR. |
Step 5: Create pull request for review the changes
Once submitted the changes need to create pull request from GitHub for review. Pull requests let you tell others about changes you’ve pushed to a branch in a repository on GitHub. Once a pull request is opened, you can discuss and review the potential changes with collaborators and add follow-up commits before your changes are merged into the base branch.
- Click on “Compare & pull request” button.

- Provide the commit request and Click on “Create pull request” button.
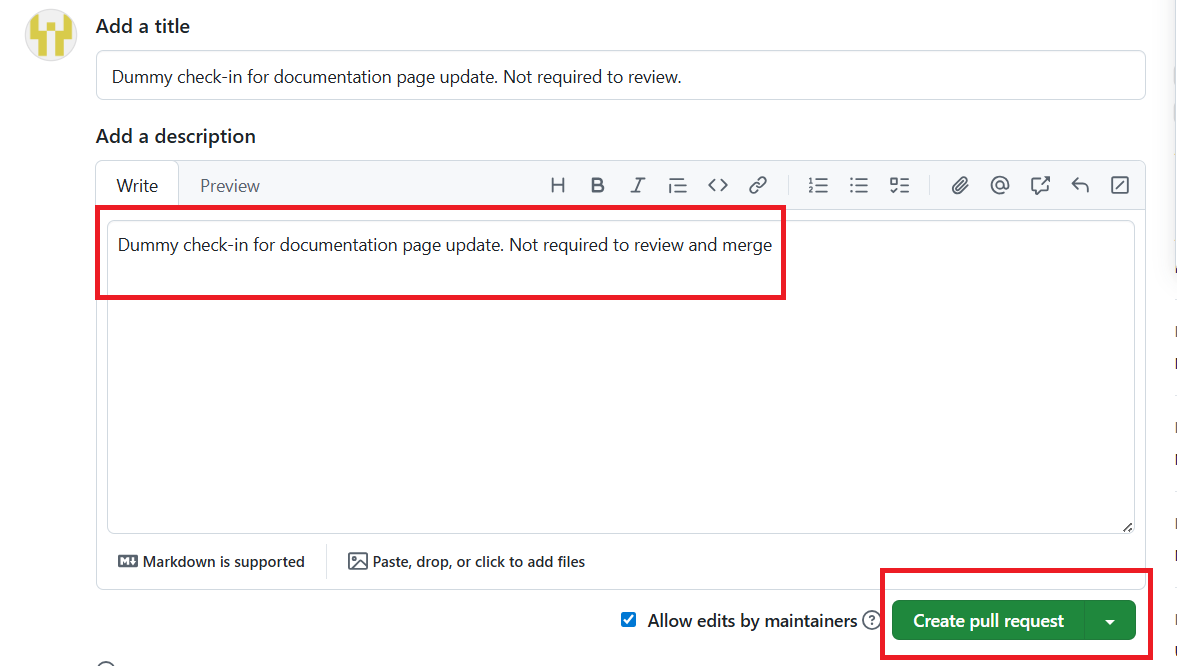
- Pull Request page will be created.
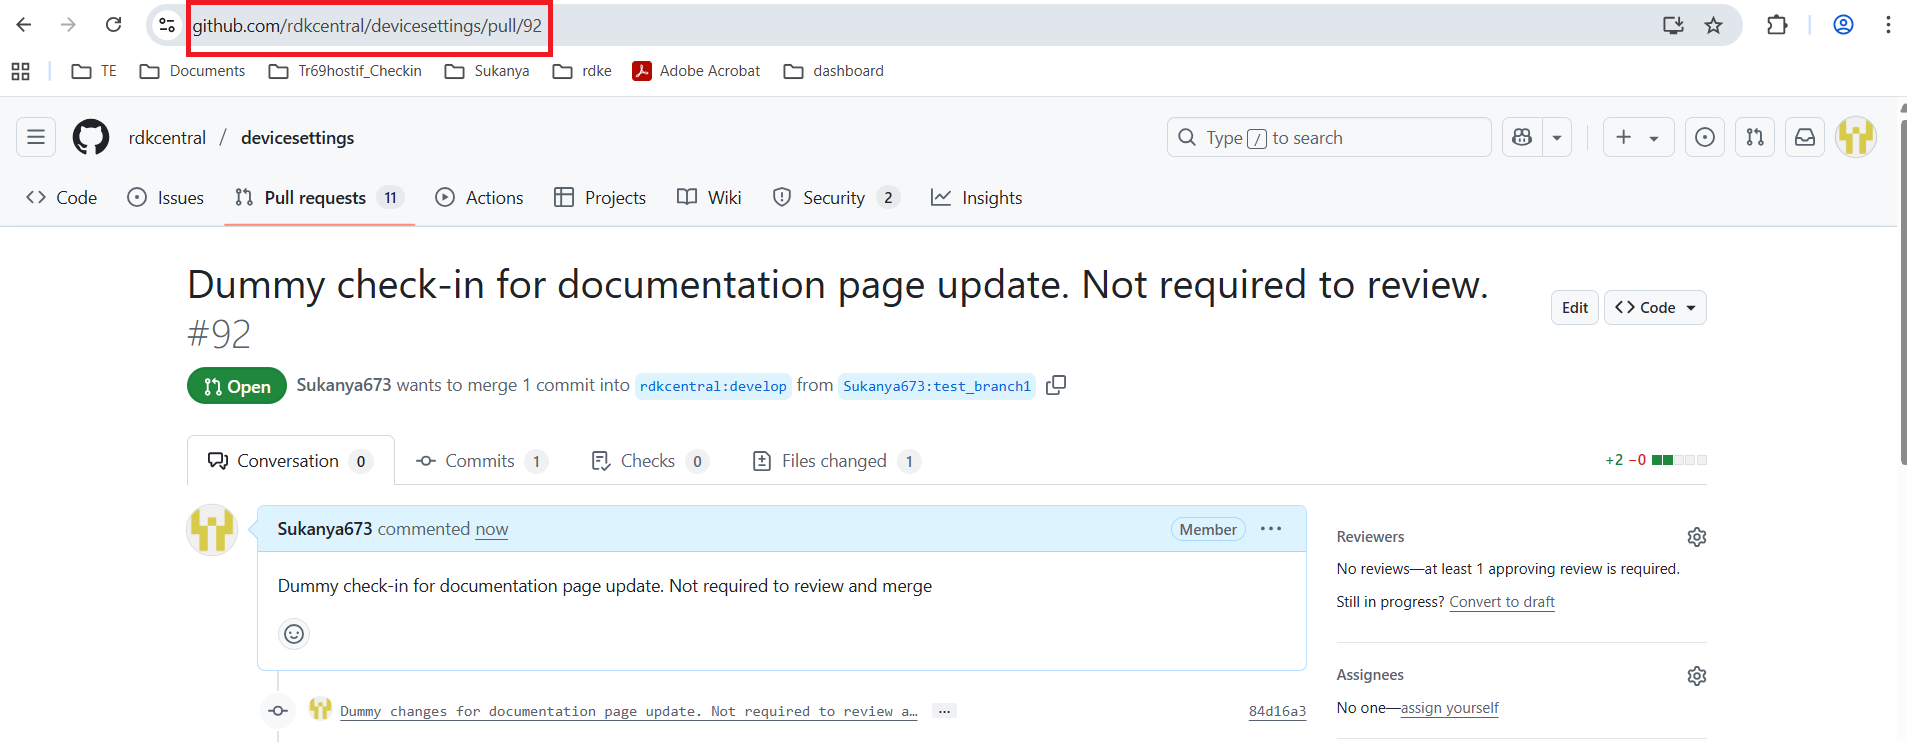
Step 6: Working on review comments
Once you’ve created a pull request, you can push commits from your workspace to add them to your existing pull request. These commits will appear in chronological order within your pull request and the changes will be visible in the “Files changed” tab.
Other contributors can review your proposed changes, add review comments, contribute to the pull request discussion, and even add commits to the pull request.
Documenting the Code
Why to Document?
Writing documentation improves the design of your code. Talking through your API and design decisions on paper allows you to think about them in a more formalized way. A nice side effect is that it allows people to contribute code that follows your original intentions as well.
How to Document?
RDK component code is documented following the Doxygen standards and guidelines. Doxygen is a popular open-source tool for generating documentation from annotated C/C++ sources. Also, Doxygen supports documenting code written in other programming languages, such as Python, PHP, Java, etc.
Tools Required for Doxygen Documentation
The following tools are required to be installed in Linux machine (through apt-get install) to generate documentation with respect to various data flow diagrams.
- doxygen: It is a tool for a documentation system for various programming languages such as C++, C, Java and Objective-C.
- graphviz: Rich set of graph drawing tools. It was required to fulfill the need for centralized documentation presenting all available tools in the graphviz package.
- dot: Filter for drawing directed graphs. A graph that can be drawn as hierarchy. It reads attributed graph files and writes drawings. By default, the output format dot is the input file with layout coordinates appended.
- perl: It is a script file used by doxygen, and it should be present in the system.
- mscgen: Message Sequence Chart Renderer. This will help to make sequence diagram for Doxygen documentation.
Steps to Generate Document using Doxygen
The following are the steps to generate documentation using Doxygen tool.
- Create a new folder “example_name”. This is where the final report will reside.
- Go to directory “example_name”.
- Reference doxygen configuration file
- Doxygen.dox: used for customizing the index page.
- doxygen.css: style sheet file used for formatting html output.
- Doxyfile: Configuration file that is needed for generating doxygen output.
- RDK-Logo.png: RDK Logo.
- Check out all the RDK component source code (Source code must be Doxygen complaint) for which document needs to be generated, for example:
- $ git clone https://code.rdkcentral.com/r/rdk/components/generic/wifi wifi
- Edit Doxyfile and set all configurations as required, given below are examples
- PROJECT_NAME /* Name of the project */
- INPUT /* Path of source code provided as input for document generation*/
- OUTPUT_DIRECTORY /* output folder path */
- Edit doxygen.dox, if the index page needs to be customized, add module names that will be shown in output index page.
- Edit doxygen.css, for output formats, fonts, etc.
- Use the following command at the command prompt, to generate html report.
- $ doxygen Doxyfile
- Doxygen Output HTML report will be available at ‘/example_name/OUTPUT_DIRECTORY/html’ folder, open index.html file to see Doxygen report.
Steps to add module level information to components
Refer to below Doxygen Guideline Section for uniform style of adding Doxygen comments for the RDK system.
Doxygen Guideline
Introduction
The purpose of this page is to provide a uniform style of Doxygen commenting for the RDK system. It will serve as a reference for current and future developers while documenting the RDK system as it evolves. Ultimately, this will establish a consistent manner of documentation to enhance the simplicity, readability, scalability, writability, reliability, and maintainability of the system.
Documentation Style
Doxygen documentation can be generated in many formats (HTML, LaTeX, RTF, PDF, DOC). HTML generation has support for more plugins and is easier to refactor as the system changes. Doxygen style should follow a consistent format to aid development across different IDEs, reducing issues when generating documentation.
/**
 * @tagname
 */
This is an example of a Java doc style Doxygen tag, since it uses the “@” symbol. Tags using the “tagname” style are considered Qt style Doxygen tags.There should be a header file containing only Doxygen tags or a separate Doxygen file that acts as a guide for the components, classes, methods, and variables (e.g. DoxygenMainpage.h). This can be done using the @mainpage tag at the top of the file.
System
There should be a header file containing only Doxygen tags or a separate Doxygen file that acts as a guide for the components, classes, methods, and variables (e.g., DoxygenMainpage.h). This can be done using the @mainpage tag at the top of the file.
/**
 * @mainpage                    Title of Document
 *
 */
File
A file should contain the @file tag at the top of the file. This supports generation of a file list tab on the main page. It also helps when files contain multiple classes.
/**
 * @file               FileName.h
 *
 * @brief              Brief file description.
 *
 *                     Verbose file description.
 */
Classes
Classes can be tagged in a number of different ways, but in general they are tagged using the @brief and @class tags before the class declaration. Having the @author, @date, and @version supports tractability as the system is versioned throughout the software lifecycle. When updating classes, update comments like this:
#include <iostream>
using namespace std;


/**
 * @brief              Brief class description
 *
 *                     Verbose description of class.
 *
 * @class              Class Name
 */

class ClassName {
               public:
                      ClassName();
	                  ~ClassName();

                      int var1;    		/**< Comment about public member variable*/

                      /**
               		   *@brief           Brief method description
					   *
					   *                 Verbose description of method
					   *
					   *@param           Parameter in the method’s definition
					   *
					   *@return          Return value of method
				       */
                      int Function1(int x);

               protected:
					  int var2;      	/**< Comment about protected member variable*/

                      /**
               		   *@brief            Brief method description
               	       *
					   *                  Verbose description of method
				       *
					   *@param            Parameter in the method’s definition
					   *
					   *@return           Return value of method
					   */
					  int Function2(int x);

               private:
                     int var3;			/**< Comment about private member variable*/

					  /**
					   *@brief            Brief method description
				 	   *
					   *                  Verbose description of method
					   *
					   *@param            Parameter in the method’s definition
				       *
					   *@return           Return value of method
					   */
                      int Function3(int x);

};
Structs
A struct can be tagged in the same way a class, but it is best to use the @struct tag. When updating structs, update comments like this:
/**
 *@brief             Brief struct description
 *
 *@struct            Struct Name
 */
Methods
Methods can be tagged in a number of ways, but in general the @brief, @details, @param, and @return tags are used before a method’s declaration or implementation. When updating methods, update comments like this:
/**
 *@brief              Brief method description
 *
 *                    Verbose description of method
 *
 *@param           	  Parameter in the method’s definition
 *
 *@return             Return value of method
 *@retval             Verbose explanation of return values
 */
int addNumbers(int x)
{
	int sum = 0;
    sum += x;
    return sum;
}
Variables
When updating variables, update comments like this:
int number; /**< Comment about number*/
Enumerated Types
Enumerated types are tagged using the @enum. When updating enum types, update comments like this:
/**
 *@brief          Brief enum description
 *
 *@enum           enum Name
 */
Miscellaneous
There are many tags you can use with HTML markup to create unique Doxygen documentation for a given file, class, method, or variable. The following are common tags that should be used when appropriate.
/**
 *@note           A brief remark about the implementation to help clarify.
 *
 *@attention      An important remark that may cause code to break.
 *
 *@warning        An import remark that may depend on random conditions etc.
 *
 *@see            A reference to a class or a link to documentation (e.g. http://document.1a.com)
 */
/**
 *@bug            A remark about a known bug in the code.
 *
 *@todo           A remark of what needs to be done to fix issues or remaining work.
 *
 */
/**
 *@a              Formats following word in special font (used for hyperlinks)
 *
 *@b              Formats following word in bold
 *
 *@em             Formats following word in italic
 *
 *@c              Formats following word in monospaced typewriter font
 *
 */
/**
 * - bulleted list item1
 *  - sub bulleted item1
 *
 * - bulleted list item2
 *
 */
/**
 * -# numbered list item1
 * -# numbered list item2
 *
 */
/**
 *@code
    i++;
 *@endcode
 */
Setting up Doxygen Environment on Linux
Tools Required for Doxygen Documentation:
Following Tools are need to be installed in Linux machine (through apt-get install) to generate documentation with respect to various data flow diagrams.
    $ sudo apt-get install "doxy*"
    $ sudo apt-get install graphviz
    $ sudo apt-get install dot
    $ sudo apt-get install mscgen
    $ sudo apt-get install perl
Check the doxygen version by using command: $ doxygen –version
Graphviz: graphviz.org (Click the Download link on the left side of the page)