Customize Consent Preferences

We use cookies to help you navigate efficiently and perform certain functions. You will find detailed information about all cookies under each consent category below.

The cookies that are categorized as "Necessary" are stored on your browser as they are essential for enabling the basic functionalities of the site. ... 

Always Active

Necessary cookies are required to enable the basic features of this site, such as providing secure log-in or adjusting your consent preferences. These cookies do not store any personally identifiable data.

No cookies to display.

Functional cookies help perform certain functionalities like sharing the content of the website on social media platforms, collecting feedback, and other third-party features.

No cookies to display.

Analytical cookies are used to understand how visitors interact with the website. These cookies help provide information on metrics such as the number of visitors, bounce rate, traffic source, etc.

No cookies to display.

Performance cookies are used to understand and analyze the key performance indexes of the website which helps in delivering a better user experience for the visitors.

No cookies to display.

Advertisement cookies are used to provide visitors with customized advertisements based on the pages you visited previously and to analyze the effectiveness of the ad campaigns.

No cookies to display.

Try Out RDK

Created on December 11, 2024


This guide provides step-by-step instructions for bringing up RDK using a Raspberry Pi as the target device. The document covers the necessary hardware & build setup, build instructions, and detailed flashing instructions to get your Raspberry Pi ready to run the RDK software.

The RDK port for Raspberry Pi makes the RDK software stack available on a popular hardware device. Raspberry Pi (RPI) for RDK-B supports Kirkstone builds. While RDK-B is available in Gateway and Extender modes, we will detail how to try out RDK-B in Gateway mode.


Build Instructions

To set up RDK-B on a Raspberry Pi, ensure you have a Raspberry Pi 4 Model B and are using Kirkstone builds. Follow the steps below for the build process:

Build Requirements: Setting up the Host Environment

  • Linux PC: 64-bit Ubuntu 18.04 LTS (Precise supported distributions and versions are here) Note: Ubuntu 20.04 LTS is also supported.
  • Free HDD Space: Minimum 100GB free memory space
  • Raspberry Pi development kit: Raspberry Pi 4B
Host Tool Versions
Plain text
Copy to clipboard
Open code in new window
EnlighterJS 3 Syntax Highlighter
Git- 1.8.3.1 or greater
Python- 3.8.10
tar- 1.24 or greater
Git- 1.8.3.1 or greater Python- 3.8.10 tar- 1.24 or greater
Git- 1.8.3.1 or greater
Python- 3.8.10
tar- 1.24 or greater
Install the following packages for setting up your host VM:

The instructions provided below are meant to be executed via the command line on an Ubuntu machine.

Package Installation
Plain text
Copy to clipboard
Open code in new window
EnlighterJS 3 Syntax Highlighter
# essential packages installation
# super user mode is required
# major essential packages
sudo apt-get install gawk wget git-core diffstat unzip texinfo gcc-multilib g++-multilib build-essential chrpath socat bison curl cpio python3 python3-pip python3-pexpect xz-utils debianutils iputils-ping python3-git python3-jinja2 libegl1-mesa libsdl1.2-dev pylint3 xterm
Installation steps for Ubuntu 20.04
# Update and upgrade the system
sudo apt-get -y update
sudo apt-get -y upgrade
# Install essential packages
sudo apt install -y gawk wget python3-git python3-jinja2 libegl1-mesa libsdl1.2-dev pylint3 xterm python3-subunit mesa-common-dev zstd liblz4-tool git diffstat unzip texinfo gcc build-essential chrpath socat cpio python python3 python3-pip python3-pexpect xz-utils debianutils iputils-ping make xsltproc docbook-utils fop dblatex xmlto lib32z1 libc6-i386 g++-multilib curl locales vim git-extras tree valgrind exuberant-ctags cscope dos2unix lcov libcunit1-dev libjson-perl members screen silversearcher-ag git-review nano
# essential packages installation # super user mode is required # major essential packages sudo apt-get install gawk wget git-core diffstat unzip texinfo gcc-multilib g++-multilib build-essential chrpath socat bison curl cpio python3 python3-pip python3-pexpect xz-utils debianutils iputils-ping python3-git python3-jinja2 libegl1-mesa libsdl1.2-dev pylint3 xterm Installation steps for Ubuntu 20.04 # Update and upgrade the system sudo apt-get -y update sudo apt-get -y upgrade # Install essential packages sudo apt install -y gawk wget python3-git python3-jinja2 libegl1-mesa libsdl1.2-dev pylint3 xterm python3-subunit mesa-common-dev zstd liblz4-tool git diffstat unzip texinfo gcc build-essential chrpath socat cpio python python3 python3-pip python3-pexpect xz-utils debianutils iputils-ping make xsltproc docbook-utils fop dblatex xmlto lib32z1 libc6-i386 g++-multilib curl locales vim git-extras tree valgrind exuberant-ctags cscope dos2unix lcov libcunit1-dev libjson-perl members screen silversearcher-ag git-review nano
# essential packages installation
# super user mode is required

# major essential packages
sudo apt-get install gawk wget git-core diffstat unzip texinfo gcc-multilib g++-multilib build-essential chrpath socat bison curl cpio python3 python3-pip python3-pexpect xz-utils debianutils iputils-ping python3-git python3-jinja2 libegl1-mesa libsdl1.2-dev pylint3 xterm


Installation steps for Ubuntu 20.04

# Update and upgrade the system
sudo apt-get -y update
sudo apt-get -y upgrade

# Install essential packages
sudo apt install -y gawk wget python3-git python3-jinja2 libegl1-mesa libsdl1.2-dev pylint3 xterm python3-subunit mesa-common-dev zstd liblz4-tool git diffstat unzip texinfo gcc build-essential chrpath socat cpio python python3 python3-pip python3-pexpect xz-utils debianutils iputils-ping make xsltproc docbook-utils fop dblatex xmlto lib32z1 libc6-i386 g++-multilib curl locales vim git-extras tree valgrind exuberant-ctags cscope dos2unix lcov libcunit1-dev libjson-perl members screen silversearcher-ag git-review nano
Configure bash as default command interpreter for shell scripts
Plain text
Copy to clipboard
Open code in new window
EnlighterJS 3 Syntax Highlighter
sudo dpkg-reconfigure dash

Select “No”
To choose bash, when the prompt asks if you want to use dash as the default system shell- select “No”

Configure Git

Upgrade your Git version to 1.8.x or higher.

Plain text
Copy to clipboard
Open code in new window
EnlighterJS 3 Syntax Highlighter
sudo apt-get install software-properties-common
sudo add-apt-repository ppa:git-core/ppa
sudo apt-get update
sudo apt-get install git
sudo apt-get install software-properties-common sudo add-apt-repository ppa:git-core/ppa sudo apt-get update sudo apt-get install git
sudo apt-get install software-properties-common
sudo add-apt-repository ppa:git-core/ppa
sudo apt-get update
sudo apt-get install git

Once git is installed, configure your name and email using the below commands.

Plain text
Copy to clipboard
Open code in new window
EnlighterJS 3 Syntax Highlighter
# review your existing configuration
git config --list --show-origin
# configure user name and email address
git config --global user.name "John Doe"
git config --global user.email johndoe@example.com
# configure git cookies. Needed for Gerrit to only contact the LDAP backend once.
git config --global http.cookieFile /tmp/gitcookie.txt
git config --global http.saveCookies true
# review your existing configuration git config --list --show-origin # configure user name and email address git config --global user.name "John Doe" git config --global user.email johndoe@example.com # configure git cookies. Needed for Gerrit to only contact the LDAP backend once. git config --global http.cookieFile /tmp/gitcookie.txt git config --global http.saveCookies true
# review your existing configuration
git config --list --show-origin

# configure user name and email address
git config --global user.name "John Doe"
git config --global user.email johndoe@example.com

# configure git cookies. Needed for Gerrit to only contact the LDAP backend once.
git config --global http.cookieFile /tmp/gitcookie.txt
git config --global http.saveCookies true
Configure repo

In order to use Yocto build system, first you need to make sure that repo is properly installed on the machine.

Plain text
Copy to clipboard
Open code in new window
EnlighterJS 3 Syntax Highlighter
# create a bin directory
mkdir ~/bin
export PATH=~/bin:$PATH
# Download the repo tool and ensure that it is executable
curl http://commondatastorage.googleapis.com/git-repo-downloads/repo > ~/bin/repo
chmod a+x ~/bin/repo
# create a bin directory mkdir ~/bin export PATH=~/bin:$PATH # Download the repo tool and ensure that it is executable curl http://commondatastorage.googleapis.com/git-repo-downloads/repo > ~/bin/repo chmod a+x ~/bin/repo
# create a bin directory
mkdir ~/bin
export PATH=~/bin:$PATH

# Download the repo tool and ensure that it is executable
curl http://commondatastorage.googleapis.com/git-repo-downloads/repo > ~/bin/repo
chmod a+x ~/bin/repo

 *Note: It is also recommended to put credentials in .netrc when interacting with the repo. For more details on how to setup .netrc credentials, please refer this page .

A sample .netrc file is illustrated below.

machine code.rdkcentral.com

    login <YOUR_USERNAME>

    password <YOUR_PASSWORD>


Build Steps

Raspberry Pi 4 Model B Reference Platform: 
Plain text
Copy to clipboard
Open code in new window
EnlighterJS 3 Syntax Highlighter
$ mkdir <workspace dir>
$ cd <workspace dir>
#Following commands fetch the source code using repo tool
#repo init -u https://code.rdkcentral.com/r/rdkcmf/manifests -m -b
#Example:
$ repo init -u https://code.rdkcentral.com/r/rdkcmf/manifests -m rdkb-extsrc.xml -b rdkb-2024q4-kirkstone
$ repo sync --no-clone-bundle --no-tags
#Below step configures and sets up your directory to start an appropriate build
#MACHINE= source /setup-environment
#Example:
$ MACHINE=raspberrypi4-rdk-broadband source meta-cmf-raspberrypi/setup-environment
#Initiate the build using the bitbake command: bitbake
#Example:
$ bitbake rdk-generic-broadband-image
# To build TDK image
$ bitbake rdk-generic-broadband-tdk-imagee
$ mkdir <workspace dir> $ cd <workspace dir> #Following commands fetch the source code using repo tool #repo init -u https://code.rdkcentral.com/r/rdkcmf/manifests -m -b #Example: $ repo init -u https://code.rdkcentral.com/r/rdkcmf/manifests -m rdkb-extsrc.xml -b rdkb-2024q4-kirkstone $ repo sync --no-clone-bundle --no-tags #Below step configures and sets up your directory to start an appropriate build #MACHINE= source /setup-environment #Example: $ MACHINE=raspberrypi4-rdk-broadband source meta-cmf-raspberrypi/setup-environment #Initiate the build using the bitbake command: bitbake #Example: $ bitbake rdk-generic-broadband-image # To build TDK image $ bitbake rdk-generic-broadband-tdk-imagee
$ mkdir <workspace dir>
$ cd <workspace dir>


#Following commands fetch the source code using repo tool
#repo init -u https://code.rdkcentral.com/r/rdkcmf/manifests -m  -b 
#Example:
$ repo init -u https://code.rdkcentral.com/r/rdkcmf/manifests -m rdkb-extsrc.xml -b rdkb-2024q4-kirkstone 
$ repo sync --no-clone-bundle --no-tags


#Below step configures and sets up your directory to start an appropriate build
#MACHINE= source /setup-environment
#Example:
$ MACHINE=raspberrypi4-rdk-broadband source meta-cmf-raspberrypi/setup-environment


#Initiate the build using the bitbake command: bitbake 
#Example:
$ bitbake rdk-generic-broadband-image
# To build TDK image
$ bitbake rdk-generic-broadband-tdk-imagee

For CMF release, please refer: RDK-B Code Releases


Flash image 

For Raspberry Pi 4 Model B Reference Platform, following command can be used to flash the RPi image to sd card using linux machine. bmap tool should be available in linux
Flashing steps
Plain text
Copy to clipboard
Open code in new window
EnlighterJS 3 Syntax Highlighter
bzip2 -d <path to ImageName.wic.bz2>
sudo -E bmaptool copy --nobmap <path to ImageName.wic> <path to SD card space>
Example:
$ bzip2 -d rdk-generic-broadband-image-raspberrypi-rdk-broadband.wic.bz2
$ sudo -E bmaptool copy --nobmap rdk-generic-broadband-image-raspberrypi-rdk-broadband.wic /dev/sdb
bzip2 -d <path to ImageName.wic.bz2> sudo -E bmaptool copy --nobmap <path to ImageName.wic> <path to SD card space> Example: $ bzip2 -d rdk-generic-broadband-image-raspberrypi-rdk-broadband.wic.bz2 $ sudo -E bmaptool copy --nobmap rdk-generic-broadband-image-raspberrypi-rdk-broadband.wic /dev/sdb
bzip2 -d <path to ImageName.wic.bz2>
sudo -E bmaptool copy --nobmap <path to ImageName.wic> <path to SD card space>
 
Example:
 
$ bzip2 -d rdk-generic-broadband-image-raspberrypi-rdk-broadband.wic.bz2
$ sudo -E bmaptool copy --nobmap rdk-generic-broadband-image-raspberrypi-rdk-broadband.wic /dev/sdb

For flashing the image using BalenaEtcher in Windows, follow the below steps:

To flash the image on an SD card, you will need to download the BalenaEtcher application: balena.io.

*Note: Prefer to use a 32GB SD card, and there should be a minimum of 12GB of free space available in the device.
Be sure to remove all other portable flash drives/hard drives/SD cards from your computer before flashing the RDK image.

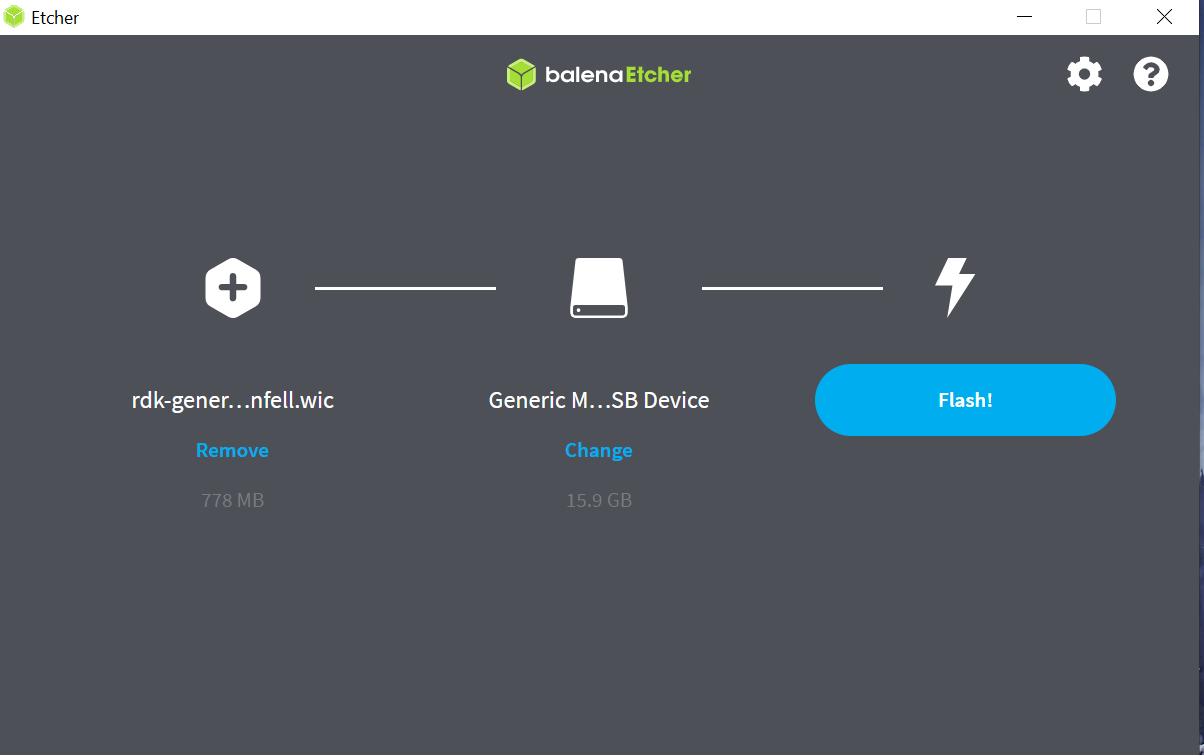
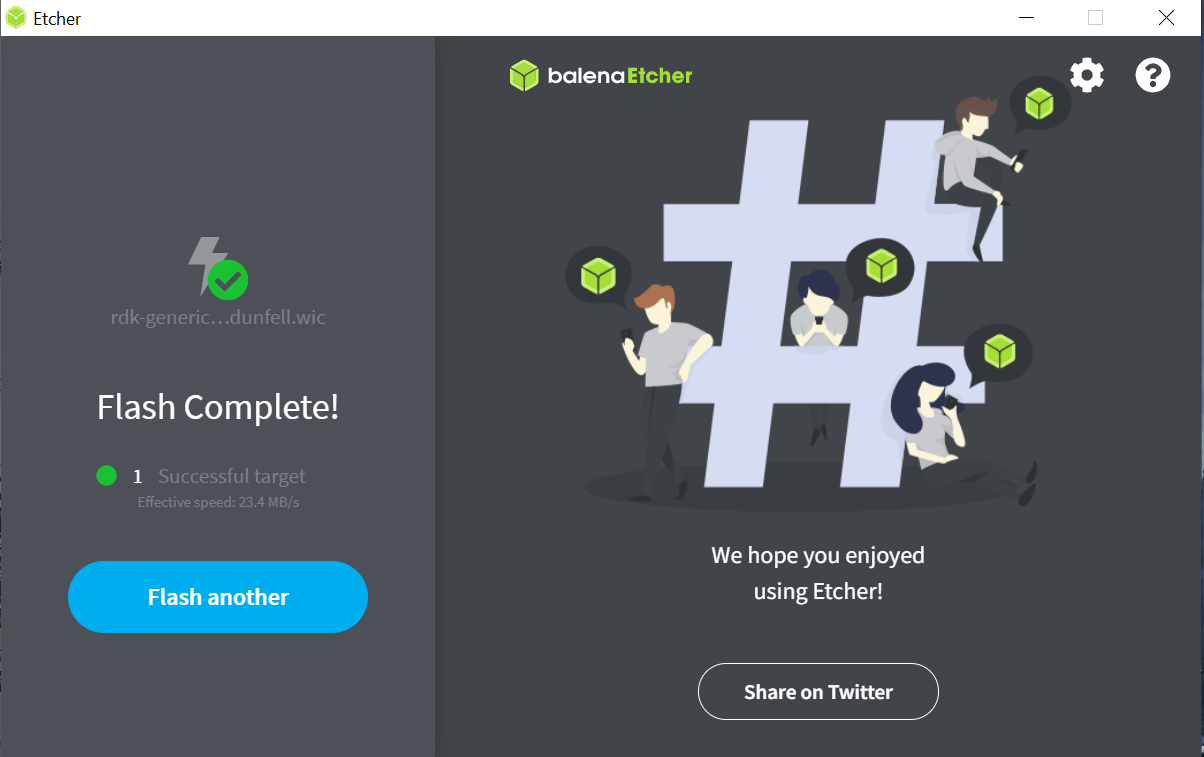
  • Open the application.
  • Select the image from your download folder.
  • Select the drive containing your SD card.
  • Click “Flash” to copy the image onto the SD card.


Test Setup requirements

RDKBSystemSetup
  1. Connect TV/Monitor to HDMI Video Output.
  2. Connect Ethernet cable to ETH port.
    1. The other end of the Ethernet cable should be connected to the network where the DHCP server is running so that the Raspberry Pi device gets assigned an IP address on boot-up.
    2. Connectivity to internet is required so that the client connected can access the internet via RDK-B gateway.
  3. Connect USB-Ethernet adapter to one of the USB slots present in Raspberry Pi.

  4. Connect Ethernet cable from USB-Ethernet adapter to the client device/machine.

  5. Insert the SD card into Micro SD Card Slot.

  6. Connect the power cable to Micro USB power input.

Once the RPI boots up, login prompts will be displayed on the TV

  1. Type “root” when the login prompt is displayed.
  2. Run following in the terminal.
    #  ifconfig
  3. Check the interface shown for USB-Ethernet adapter. e.g., eth1, eth2, … so on
  1. In case you are running in Ethernet mode, add interface of USB-Ethernet adapter to the file “/etc/utopia/system_defaults. Change lan_ethernet_physical_ifnames. It will be your lan side.
        e.g: lan_ethernet_physical_ifnames=eth1
  2. Reboot the Raspberry Pi.

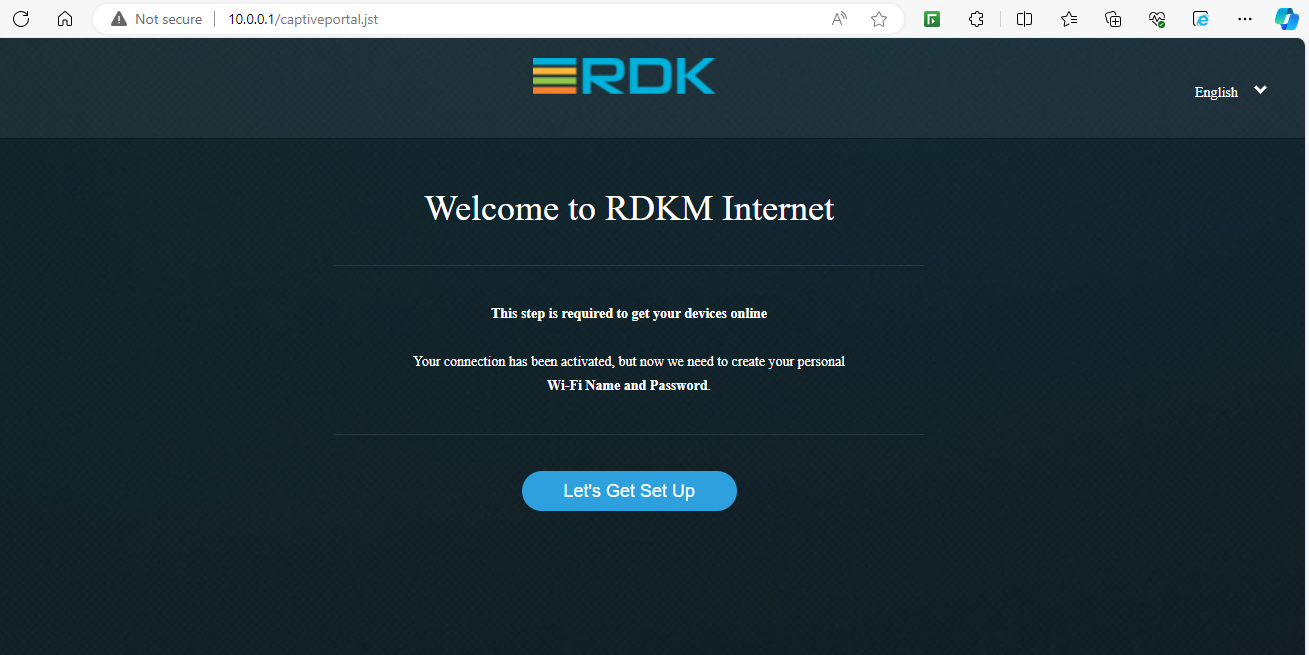
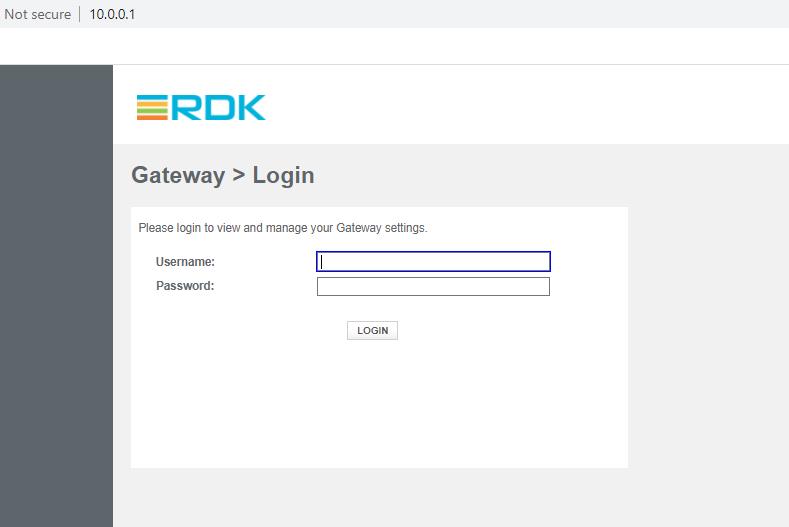
WebUI can be accessed by both the LAN clients and from the WAN Side.

  • For LAN Clients:
    • Open an internet browser on the Lan client or machine.
    • Give the following url in the browser window:
      • From LAN Side: http://10.0.0.1if we use LAN IP (10.0.0.1) then it opens captive portal page


      • From WAN Side:
        • http://<WAN IP Address of Raspberry Pi>:8080
        • For e.g http://192.168.30.230:8080
        • If you are accessing erouter IP from any wan network in the same range, it will redirect to the admin page.