
Try Out RDK-B
Raspberry Pi
Build Setup Instructions
Setting up the Host Environment
| Requirement | Yocto 3.1 LTS (Dunfell) |
|---|---|
Linux PC | 64 bit Ubuntu 18.04 LTS Precise supported distributions and versions are here |
Free HDD Space | Minimum 100GB Free memory space |
Host Tools version | Git 1.8.3.1 or greater tar 1.24 or greater Python 2.7.3 |
| Raspberry Pi development kit | |
| IPSTB Reference board | Access to repositories hosting code and binaries for reference board |
| Peripherals | TV, Keyboard |
Environment
Host Setup
Install the following packages for setting up your host VM
The instructions provided below are meant to be executed via the command line on an Ubuntu machine
# essential packages installation
# super user mode is required

# major essential packages
sudo apt-get install gawk wget git-core diffstat unzip texinfo gcc-multilib g++-multilib build-essential chrpath socat bison curl cpio python3 python3-pip python3-pexpect xz-utils debianutils iputils-ping python3-git python3-jinja2 libegl1-mesa libsdl1.2-dev pylint3 xterm
Configure bash as default command interpreter for shell scripts
sudo dpkg-reconfigure dash
Select “No”
To choose bash, when the prompt asks if you want to use dash as the default system shell – select “No”
Configure Git
Upgrade your Git version to 1.8.x or higher
Once git is installed, configure your name and email using the below commands
# review your existing configuration
git config --list --show-origin

# configure user name and email address
git config --global user.name "John Doe"
git config --global user.email johndoe@example.com

# configure git cookies. Needed for Gerrit to only contact the LDAP backend once.
git config --global http.cookieFile /tmp/gitcookie.txt
git config --global http.saveCookies true
Configure repo
In order to use Yocto build system, first you need to make sure that repo is properly installed on the machine:
# create a bin directory
mkdir ~/bin
export PATH=~/bin:$PATH

# Download the repo tool and ensure that it is executable
curl http://commondatastorage.googleapis.com/git-repo-downloads/repo > ~/bin/repo
chmod a+x ~/bin/repo
Credential configuration (Only for Amlogic reference board)
*Note: it is also recommended to put credentials in .netrc when interacting with the repo.
A sample .netrc file is illustrated below
machine code.rdkcentral.com login <YOUR_USERNAME> password <YOUR_PASSWORD> |
|---|
Build
Yocto 2.2 – Morty’s build environment and image build steps
$ mkdir <your workspace directory>
$ cd <your workspace directory>
$ repo init -u https://code.rdkcentral.com/r/manifests -b rdk-next -m rdkb-extsrc.xml
$ repo sync -j4 --no-clone-bundle
$ source meta-cmf-raspberrypi/setup-environment (Select option raspberrypi-rdk-broadband.conf)
$ bitbake rdk-generic-broadband-image
On Successful build, The kernel Image and root filesystem will be created under the below path, ~/tmp/deploy/images/raspberrypi-rdk-broadband folder
Yocto 3.1 – Dunfell’s build environment and image build steps
For RPI 3B/3B+ Model Reference Platform:
$ mkdir <workspace dir>
$ cd <workspace dir>
$ repo init -u https://code.rdkcentral.com/r/manifests -b dunfell -m rdkb-extsrc.xml
$ repo sync -j`nproc` --no-clone-bundle
$ MACHINE=raspberrypi-rdk-broadband source meta-cmf-raspberrypi/setup-environment
$ bitbake rdk-generic-broadband-image
For RPI 4B Model Reference Platform:
$ mkdir <workspace dir>
$ cd <workspace dir>
$ repo init -u https://code.rdkcentral.com/r/manifests -b dunfell -m rdkb-extsrc.xml
$ repo sync -j`nproc` --no-clone-bundle
$ MACHINE=raspberrypi4-rdk-broadband source meta-cmf-raspberrypi/setup-environment
$ bitbake rdk-generic-broadband-image
Flash image and bring up:
For RPI 3B/3B+ Model Reference Platform, following command can be used to flash the RPI image to sd card using linux machine . dd tool should be available in linux
# Insert the micro SD card and mention the card's device file name
# input file (if) is the image file to flash and the output file (of) is the card's device file name
$sudo dd if=<path to ImageName.Rpi-sdimg> of=<path to SD card space> bs=4M
#Example:
$sudo dd if=rdk-generic-mediaclient-wpe-image.Rpi-sdimg of=/dev/sdb bs=4M
149+0 records in
149+0 records out
624951296 bytes (625 MB) copied, 39.7752 s, 15.7 MB/s
For Flashing the image using BalenaEtcher in windows follow below steps:
To flash the image on an SD card, you will need to download the balenaEtcher application-https://www.balena.io/etcher/
*Note: Prefer to use a 32GB sd card and there should be a minimum of 12GB of free space available in the device. Be sure to remove all other portable flash drives/hard drives/SD cards from your computer before flashing the RDK image
- Open the application
- Select the image from your download folder
- Select the drive containing your SD card
- Click “Flash” to copy the image onto the SD card


For RPI 4B Model Reference Platform, following command can be used to flash the RPI image to sd card using linux machine . bmap tool should be available in linux
bzip2 -d <path to ImageName.wic.bz2>
sudo -E bmaptool copy --nobmap <path to ImageName.wic> <path to SD card space>

Example:

$ bzip2 -d rdk-generic-broadband-image-raspberrypi-rdk-broadband.wic.bz2
$ sudo -E bmaptool copy --nobmap rdk-generic-broadband-image-raspberrypi-rdk-broadband.wic /dev/sdb
System Setup:
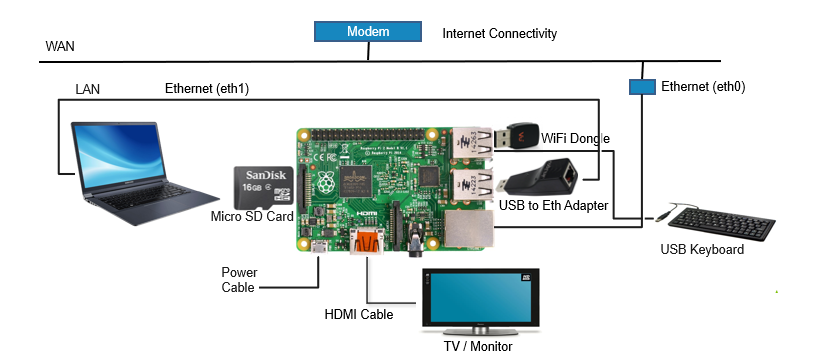
- Connect TV/Monitor to HDMI Video Output.
- Connect Ethernet cable to ETH port.
- The other end of the Ethernet cable should be connected to the network where DHCP server is running so that the Raspberry Pi device gets assigned an IP address on boot-up.
- Connectivity to Internet is required so that the client connected can access the internet via RDK-B gateway.
Connect USB-Ethernet adapter to one of the USB slots present in Raspberry Pi.
Connect Ethernet cable from USB-Ethernet adapter to the client device/machine.
Insert the SD card into Micro SD Card Slot.
Connect Power cable to Micro USB power Input.
- Type “root” when the login prompt is displayed
- Run following in the terminal
# ifconfig - Check the interface shown for USB-Ethernet adapter. e.g eth1, eth2 … so on
- In case you are running in Ethernet mode, add interface of USB-Ethernet adapter in file “/etc/utopia/system_defaults. Change lan_ethernet_physical_ifnames. It will be your lan side.
e.g:lan_ethernet_physical_ifnames=eth1 - Reboot the Raspberry Pi
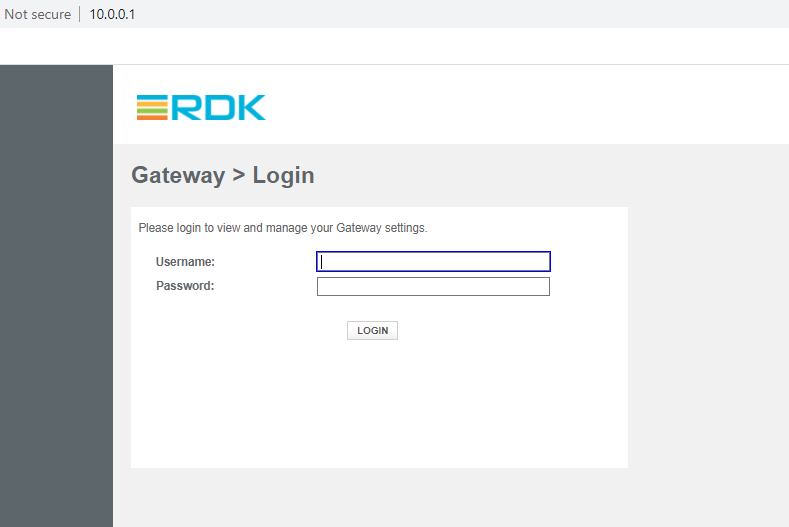
WebUI
WebUI can be accessed by both the LAN clients and from the WAN Side.
- For LAN Clients:
- Open an internet browser on the Lan client/machine.
- Give the following url in the browser window:
- From LAN Side:http://10.0.0.1–if we use LAN ip (10.0.0.1) then it opens captive portal page

- From WAN Side:
- http://<WAN IP Address of Raspberry Pi>:8080
- For e.g http://10.213.51.122:8080
- if you use erouter0 IP, then it opens admin page
- From WAN Side:
Emulator
Build Setup Instructions
Setting up the Host Environment
| Requirement | Yocto 3.1 LTS (Dunfell) |
|---|---|
Linux PC | 64 bit Ubuntu 18.04 LTS Precise supported distributions and versions are here |
Free HDD Space | Minimum 100GB Free memory space |
Host Tools version | Git 1.8.3.1 or greater tar 1.24 or greater Python 2.7.3 |
| Raspberry Pi development kit | |
| IPSTB Reference board | Access to repositories hosting code and binaries for reference board |
| Peripherals | TV, Keyboard |
Environment
Host Setup
Install the following packages for setting up your host VM
The instructions provided below are meant to be executed via the command line on an Ubuntu machine
# essential packages installation
# super user mode is required

# major essential packages
sudo apt-get install gawk wget git-core diffstat unzip texinfo gcc-multilib g++-multilib build-essential chrpath socat bison curl cpio python3 python3-pip python3-pexpect xz-utils debianutils iputils-ping python3-git python3-jinja2 libegl1-mesa libsdl1.2-dev pylint3 xterm
Configure bash as default command interpreter for shell scripts
sudo dpkg-reconfigure dash
Select “No”
To choose bash, when the prompt asks if you want to use dash as the default system shell – select “No”
Configure Git
Upgrade your Git version to 1.8.x or higher
Once git is installed, configure your name and email using the below commands
# review your existing configuration
git config --list --show-origin

# configure user name and email address
git config --global user.name "John Doe"
git config --global user.email johndoe@example.com

# configure git cookies. Needed for Gerrit to only contact the LDAP backend once.
git config --global http.cookieFile /tmp/gitcookie.txt
git config --global http.saveCookies true
Configure repo
In order to use Yocto build system, first you need to make sure that repo is properly installed on the machine:
# create a bin directory
mkdir ~/bin
export PATH=~/bin:$PATH

# Download the repo tool and ensure that it is executable
curl http://commondatastorage.googleapis.com/git-repo-downloads/repo > ~/bin/repo
chmod a+x ~/bin/repo
Credential configuration (Only for Amlogic reference board)
*Note: it is also recommended to put credentials in .netrc when interacting with the repo.
A sample .netrc file is illustrated below
machine code.rdkcentral.com login <YOUR_USERNAME> password <YOUR_PASSWORD> |
|---|
Build
# initialize the manifest with repo tool
repo init -u https://code.rdkcentral.com/r/manifests -m rdkb-extsrc.xml -b dunfell
repo sync -j4 --no-clone-bundle
MACHINE=qemux86broadband source meta-cmf/setup-environment
bitbake rdk-generic-broadband-image
Flash image and bring up
Host Requirements:
| Requirement | Remarks |
|---|---|
| Linux | 32/64 bit Ubuntu 16.04 operating system |
| Free HDD Space | Minimum 100GB Free Memory |
| Oracle Virtual Box | 4.3.18 or higher |
Install Virtual Box and follow the following steps to bring up RDK Emulator on Virtual Box:
In the following steps, it is recommended to review the description and screenshot completely before proceeding with steps.
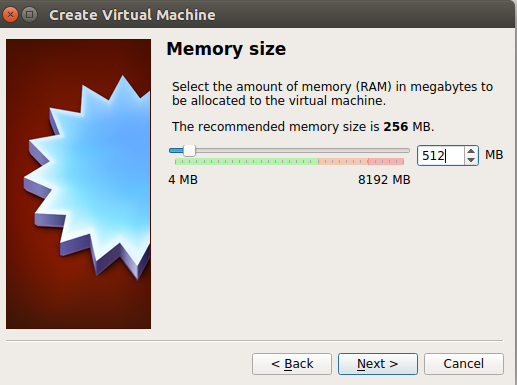
STEP 1: Create your new VM Instance:
- Open Virtualbox → Select New [A popup will come up]→ Select Type as ‘Linux’→ Select Version as ‘Other Linux (32 Bit)’→ Click on “Next”
- Choose a Memory Size of 512 MB

Use an existing virtual hard drive file which would be your newly built image in *.vmdk format and create your VM:

STEP 2: Configure your new VM Instance:
- Click on “Settings” tab to configure your new VM instance

- Configure your VMs network settings
- Choose “Bridged Adapter” mode as shown in the screenshot below

STEP 3: Run Emulator in Vbox :
Boot up your VM by clicking on start
Click “start” to launch the Emulator vmdk image
Provide “root” to login Emulator as shown in the screen shot
Emulator usually fetches IP address by default,i.e “ifconfig erouter0”
If not then assign statically using the commands.
For ex: ifconfig eth0/erouter0 192.168.1.49
route add default gw 192.168.1.1 eth0/erouter0
Once IP address for Emulator is up, Emulator shall be accessed in the Host PC using the below command
Once you have the IP address you may SSH into your VM from your linux shell console. Use root as the ssh user.
$ ssh root@<erouter0 ip> |
|---|
STEP 4: Lanching Emulator in WebUI :
In the Host-PC Browser, Enter the eth0/erouter0 IP:8080 to get WebUI
Ex:http://192.168.1.49:8080WebUI Login Credential’s
Username: admin
Password: password
Launching WebUI App:
In the Host-PC Browser, Enter the eth0 /erouter0 IP:8080 to get WebUI
WebUI Login Credential’s
Username: admin
Password: password

RDK-B Environment Setup

Turris Omnia
Build Setup Instructions
Upgrading Yocto version from morty to dunfell(Yocto 3.1) for Turris Omnia Reference Platform
Considerations for broadband & extender build:
- OpenEmbedded and Yocto: Dunfell
- Linux kernel 4.14
- Version upgrades for bitbake and other oe recipes(if needed).
Setting up the Host Environment:
Pre-Requisites
Requirement | Yocto 3.1 LTS (Dunfell) |
|---|---|
Linux | 64 bit Ubuntu 18.04 LTS Precise supported distributions and versions are here |
Free HDD Space | Minimum 100GB Free memory space |
Oracle Virtual Box | – |
Wireless Adapter | – |
USB to Ethernet Switch | |
| Host Tools version |
|
Environment
Install the following packages for setting up your host VM
The instructions provided below are meant to be executed via the command line on an Ubuntu machine
# essential packages installation
# super user mode is required

# major essential packages
$ sudo apt-get install gawk wget git-core diffstat unzip texinfo gcc-multilib build-essential chrpath socat cpio python python3 python3-pip python3-pexpect xz-utils debianutils iputils-ping python3-git python3-jinja2 libegl1-mesa libsdl1.2-dev pylint3 xterm
Configure bash as default command interpreter for shell scripts
sudo dpkg-reconfigure dash
Select “No”
To choose bash, when the prompt asks if you want to use dash as the default system shell – select “No”
Configure Git
Upgrade your Git version to 1.8.x or higher
On Ubuntu 16.04 LTS, if you are unable to upgrade your git version using apt-get, then follow the below steps in order to upgrade
sudo apt-get install software-properties-common
sudo add-apt-repository ppa:git-core/ppa
sudo apt-get update
sudo apt-get install git
Once git is installed, configure your name and email using the below commands
# review your existing configuration
git config --list --show-origin

# configure user name and email address
git config --global user.name "John Doe"
git config --global user.email johndoe@example.com

# configure git cookies. Needed for Gerrit to only contact the LDAP backend once.
git config --global http.cookieFile /tmp/gitcookie.txt
git config --global http.saveCookies true
Configure repo
In order to use Yocto build system, first you need to make sure that repo is properly installed on the machine:
# create a bin directory
mkdir ~/bin
export PATH=~/bin:$PATH

# Download the repo tool and ensure that it is executable
curl http://commondatastorage.googleapis.com/git-repo-downloads/repo > ~/bin/repo
chmod a+x ~/bin/repo
Credential configuration
Note: it is also recommended to put credentials in .netrc when interacting with the repo.
A sample .netrc file is illustrated below
machine code.rdkcentral.com login <YOUR_USERNAME> password <YOUR_PASSWORD> |
|---|
Build
Build instructions for creating rdk-generic-broadband-image
The following commands fetches the source code of turris using repo tool and create the image using bitbake
Note: Cloning the code before login once to code.rdkcentral.com, user would get the Authentication error, even though the account is in good standing and has all the required access. Please login to code.rdkcentral.com before attempting to clone.
OpenSync backhaul credential
Please get patch(service.patch) for meta-turris layer from Plume to apply backhaul credential(SSID:PSK). Please check Cloud Access Guide for more details.
#Create workspace directory
mkdir <workspace dir>
cd <workspace dir>

repo init -u https://code.rdkcentral.com/r/manifests -m rdkb-turris-pod-extsrc.xml -b dunfell
repo sync -j4 --no-clone-bundle
cd meta-turris && git apply service.patch && cd ../
MACHINE=turris-extender source meta-turris/setup-environment build-turris-ext
bitbake rdk-generic-extender-image
Note: The kernel Image and root filesystem will be placed under <workspace dir>/build-turris-ext/tmp/deploy/images/turris-extender director
Flash image and bring up:
Flashing:
Requirements:
Two files are required to bring up Newer model of Turris Omnia (Turris Omnia 2019 & Turris Omnia 2020)[Revision: CZ11NIC23]
- Omnia Medkit image :
- Compressed WIC image(
Example:rdkb-generic-broadband-image_default_20200809095738.rootfs.wic.*) coming out of Image build . Extract *.wic.gz or *.wic.bz2 image and rename to sysupgrade.img. For example,
gunzip rdkb-generic-broadband-image_default_*.rootfs.wic.gz
(or)
bzip2 -d rdkb-generic-broadband-image_default_*.rootfs.wic.bz2

mv rdkb-generic-broadband-image_default_*.rootfs.wic sysupgrade.img
Flashing Steps
Flashing with Medkit & Sysupgrade images
NOTE : This upgrade procedure wipes out eMMC flash storage(/dev/mmcblk0) completely. Earlier partitions are lost.
Perform following steps to flash New Turris Omnia with RDKB image.
- Connect a USB flash drive to PC that is running Linux. Create a partition in flash drive and format the partition with mkfs.ext2
- Copy both attached medkit image and sysupgrade.img image to USB flash drive.
- Disconnect other USB devices from the Turris Omnia and connect the flash drive to either USB port.
Hold down the reset button (backside, bottom centre) and plug in the power cord. Wait until the fourth LED lights up (green), then release (before the 5th LED lights up). Please check here to see more detail on rescue modes.
- Wait approximately 2 minutes for the Turris Omnia to flash itself with the temporary image, during which LEDs will change multiple times.
Creating additional partitions
Create partitions for additional rootfs and nvram. Then, reboot the system.
root@TurrisOmnia-GW:~# fdisk /dev/mmcblk0

Welcome to fdisk (util-linux 2.28.1).
Changes will remain in memory only, until you decide to write them.
Be careful before using the write command.


Command (m for help): p
Disk /dev/mmcblk0: 7.3 GiB, 7818182656 bytes, 15269888 sectors
Units: sectors of 1 * 512 = 512 bytes
Sector size (logical/physical): 512 bytes / 512 bytes
I/O size (minimum/optimal): 512 bytes / 512 bytes
Disklabel type: dos
Disk identifier: 0xec7ceddc

Device         Boot Start    End Sectors   Size Id Type
/dev/mmcblk0p1 *     2048  34623   32576  15.9M  c W95 FAT32 (LBA)
/dev/mmcblk0p2      34816 755359  720544 351.8M 83 Linux

Command (m for help): n
Partition type
   p   primary (2 primary, 0 extended, 2 free)
   e   extended (container for logical partitions)
Select (default p):

Using default response p.
Partition number (3,4, default 3):
First sector (34624-15269887, default 755712):
Last sector, +sectors or +size{K,M,G,T,P} (755712-15269887, default 15269887): +512M

Created a new partition 3 of type 'Linux' and of size 512 MiB.

Command (m for help): n
Partition type
   p   primary (3 primary, 0 extended, 1 free)
   e   extended (container for logical partitions)
Select (default e):

Using default response e.
Selected partition 4
First sector (34624-15269887, default 1804288):
Last sector, +sectors or +size{K,M,G,T,P} (1804288-15269887, default 15269887):

Created a new partition 4 of type 'Extended' and of size 6.4 GiB.

Command (m for help): n
All primary partitions are in use.
Adding logical partition 5
First sector (1806336-15269887, default 1806336):
Last sector, +sectors or +size{K,M,G,T,P} (1806336-15269887, default 15269887): +128M

Created a new partition 5 of type 'Linux' and of size 128 MiB.

Command (m for help): p
Disk /dev/mmcblk0: 7.3 GiB, 7818182656 bytes, 15269888 sectors
Units: sectors of 1 * 512 = 512 bytes
Sector size (logical/physical): 512 bytes / 512 bytes
I/O size (minimum/optimal): 512 bytes / 512 bytes
Disklabel type: dos
Disk identifier: 0xec7ceddc

Device         Boot   Start      End  Sectors   Size Id Type
/dev/mmcblk0p1 *       2048    34623    32576  15.9M  c W95 FAT32 (LBA)
/dev/mmcblk0p2        34816   755359   720544 351.8M 83 Linux
/dev/mmcblk0p3       755712  1804287  1048576   512M 83 Linux
/dev/mmcblk0p4      1804288 15269887 13465600   6.4G  5 Extended
/dev/mmcblk0p5      1806336  2068479   262144   128M 83 Linux

Command (m for help): w
The partition table has been altered.
Calling ioctl() to re-read partition table.
Re-reading the partition table failed.: Device or resource busy

The kernel still uses the old table. The new table will be used at the next reboot or after you run partprobe(8) or kpartx(8).

root@TurrisOmnia-GW:~# reboot
Format newly created two partitions as ext2 partitions.
root@TurrisOmnia-GW:~# mkfs.ext2  /dev/mmcblk0p3
mke2fs 1.43 (17-May-2016)
Discarding device blocks: done
Creating filesystem with 131072 4k blocks and 32768 inodes
Filesystem UUID: c2d8887f-6e6b-4d9b-b57a-f3bc28374841
Superblock backups stored on blocks:
	32768, 98304

Allocating group tables: done
Writing inode tables: done
Writing superblocks and filesystem accounting information: done

root@TurrisOmnia-GW:~# mkfs.ext2  /dev/mmcblk0p5
mke2fs 1.43 (17-May-2016)
Discarding device blocks: done
Creating filesystem with 131072 1k blocks and 32768 inodes
Filesystem UUID: 2e4cee8d-f1d5-488a-99f9-5e3a233dcf4f
Superblock backups stored on blocks:
	8193, 24577, 40961, 57345, 73729

Allocating group tables: done
Writing inode tables: done
Writing superblocks and filesystem accounting information: done
RDK Firmware(Image) upgrade
Firmware upgrade is done with multiple approaches.
Approach 2(Quick):
This is the quickest and main method of Turris image upgradation.
Copy zImage , dtb file and rootfs files(not *dbg* rootfs file) from PC or VM to /tmp/ directory of Turris Omnia which runs RDK Image.
For example:
scp zImage--4.14.22-r0-turris-20200720105910.bin root@<TurrisOmnia-IP>:/tmp/
scp armada-385-turris-omnia.dtb root@<TurrisOmnia-IP>:/tmp/
scp rdkb-generic-broadband-image_default_20200720105910.rootfs.tar.gz root@<TurrisOmnia-IP>:/tmp/
In Turris Omnia, execute /lib/rdk/TurrisFwUpgrade.sh to flash new RDK image present in /tmp folder
sh /lib/rdk/TurrisFwUpgrade.sh
Turris Omnia will now run upgraded version of Yocto based RDK image.
There are other 2 approaches :
- “approach 1 – RDK firmware upgrade with XConf server” and
- “approach 3 – Fallback to OpenWrt OS ” . Note: If any issues faced with approach 2 ,please refer “Approach 3” – Fallback to OpenWrt OS.
Bring up:
- To bring up serial port using any terminal software ( like Putty, Minicom,Teraterm ) in below configuration of 115200 8N1 and no to hardware and software flow control.
#set the serial device as /dev/ttyUSB0
#lock file location -> /var/lock
#Bps/par/Bits -> 115200 8N1
#Hardware Flow control -> No
#Software Flow control -> No
#enter
- We can use minicom to get the IP of the device post which we can connect ssh from other terminal using : ssh <username-root>@<ip address>
- We can try some commands such as ps -ax and ccsp commands
ad@ad-HP-Compaq-Elite-8300-CMT:~$ sudo minicom
[sudo] password for ad:


Welcome to minicom 2.7.1

OPTIONS: I18n
Compiled on Aug 13 2017, 15:25:34.
Port /dev/ttyUSB0, 19:10:00

Press CTRL-A Z for help on special keys

 0
Setting bus to 1
BOOT eMMC FS
3970416 bytes read in 218 ms (17.4 MiB/s)
19565 bytes read in 29 ms (658.2 KiB/s)
Kernel image @ 0x1000000 [ 0x000000 - 0x3c9570 ]
## Flattened Device Tree blob at 02000000
   Booting using the fdt blob at 0x2000000
   Loading Device Tree to 0fff8000, end 0ffffc6c ... OK

Starting kernel ...

[    0.000000] Booting Linux on physical CPU 0x0
[    0.000000] Linux version 5.15.44-yocto-standard (oe-user@oe-host) (arm-rdk-linux-gnueabi-gcc (GCC) 9.3.0, GNU ld (GNU Binutils) 2
[    0.000000] CPU: ARMv7 Processor [414fc091] revision 1 (ARMv7), cr=10c5387d
[    0.000000] CPU: PIPT / VIPT nonaliasing data cache, VIPT aliasing instruction cache
[    0.000000] OF: fdt: Machine model: Turris Omnia
[    0.000000] Memory policy: Data cache writealloc
[    0.000000] Zone ranges:
[    0.000000]   Normal   [mem 0x0000000000000000-0x000000002fffffff]
[    0.000000]   HighMem  [mem 0x0000000030000000-0x000000007fffffff]
[    0.000000] Movable zone start for each node
[    0.000000] Early memory node ranges
[    0.000000]   node   0: [mem 0x0000000000000000-0x000000007fffffff]
[    0.000000] Initmem setup node 0 [mem 0x0000000000000000-0x000000007fffffff]
[    0.000000] percpu: Embedded 11 pages/cpu s14156 r8192 d22708 u45056
[    0.000000] Built 1 zonelists, mobility grouping on.  Total pages: 522560
[    0.000000] Kernel command line: earlyprintk console=ttyS0,115200 root=/dev/mmcblk0p5 rootfstype=ext2 rw rootwait cfg80211.freg=**
[    0.000000] Bootloader command line not present
[    0.000000] Unknown kernel command line parameters "earlyprintk", will be passed to user space.
[    0.000000] Dentry cache hash table entries: 131072 (order: 7, 524288 bytes, linear)
[    0.000000] Inode-cache hash table entries: 65536 (order: 6, 262144 bytes, linear)
[    0.000000] mem auto-init: stack:off, heap alloc:off, heap free:off
[    0.000000] Memory: 2064556K/2097152K available (9216K kernel code, 650K rwdata, 1796K rodata, 1024K init, 244K bss, 32596K reser)
[    0.000000] SLUB: HWalign=64, Order=0-3, MinObjects=0, CPUs=2, Nodes=1
[    0.000000] rcu: Hierarchical RCU implementation.
[    0.000000] rcu:     RCU restricting CPUs from NR_CPUS=4 to nr_cpu_ids=2.
root@TurrisOmnia-GW:~# cat /version.txt
imagename:rdkb-generic-broadband-image_rdk-next_20221011054255
BRANCH=rdk-next
YOCTO_VERSION=dunfell
VERSION=4.10.11.22
SPIN=0
BUILD_TIME="2022-10-11 05:42:55"
Generated on Tue Oct 11  05:42:55 UTC 2022
root@TurrisOmnia-GW:~# [  225.228346] EXT2-fs (mmcblk0p5): error: ext2_lookup: deleted inode referenced: 19925
[  225.232593] wanmanager[9723]:[  225.239781] EXT2-fs (mmcblk0p5): error: ext2_lookup: deleted inode referenced: 19925
 rdk_dyn_log_initg_dl_socket = 3 __progname = wanmanager

root@RaspberryPi-Gateway:~# ifconfig erouter0
erouter0  Link encap:Ethernet  HWaddr B8:27:EB:8D:99:5F
          inet addr:192.168.2.153  Bcast:192.168.2.255  Mask:255.255.255.0
          inet6 addr: fe80::ba27:ebff:fe8d:995f/64 Scope:Link
          UP BROADCAST RUNNING MULTICAST  MTU:1500  Metric:1
          RX packets:2489 errors:0 dropped:352 overruns:0 frame:0
          TX packets:323 errors:0 dropped:0 overruns:0 carrier:0
          collisions:0 txqueuelen:1000
          RX bytes:222391 (217.1 KiB)  TX bytes:40578 (39.6 KiB)

root@RaspberryPi-Gateway:~# ps -a | grep eRT
  412 non-root  0:00 /usr/bin/CcspCrSsp -subsys eRT.
  468 non-root  0:01 /usr/bin/PsmSsp -subsys eRT.
 1043 root      0:02 /usr/bin/CcspPandMSsp -subsys eRT.
 1720 root      0:00 /usr/bin/CcspTandDSsp -subsys eRT.
 1735 non-root  0:00 /usr/bin/CcspEthAgent -subsys eRT.
 1745 root      0:00 /usr/bin/notify_comp -subsys eRT.
 1752 root      0:01 /usr/bin/CcspWifiSsp -subsys eRT. 2
 1769 non-root  0:01 /usr/bin/CcspTr069PaSsp -subsys eRT.
 1785 root      0:00 /usr/bin/CcspAdvSecuritySsp -subsys eRT.
 1789 root      0:00 /usr/bin/CcspXdnsSsp -subsys eRT.
 1806 non-root  0:00 /usr/bin/CcspLMLite -subsys eRT.
 1851 root      0:00 /usr/rdk/wanmanager/wanmanager -subsys eRT.
 1907 root      0:00 /usr/bin/fwupgrademanager -subsys eRT.
 1935 root      0:00 /usr/bin/cellularmanager -subsys eRT.
12125 root      0:00 grep eRT
root@RaspberryPi-Gateway:~#
- In browser we can execute the IP address of the box to see WEBUI using <IP address>:<port.no>
