
Tata Elxsi Accelerator UI Customization
Introduction
Tata Elxsi Accelerator UI Application can be customized based on the operator requirement using our CustomUI application (Customer Login Page ) .Only the applications and contents configured against a particular operator id will be available to that operator.
Overview
This document provides the following details:
- Login to CustomUI Application
- Customize the application
- Box configuration
Login
The steps to login as a new operator to the CustomUI Application is listed here:
Steps to Login
Follow the steps listed here to login as an existing Operator
- Click on Customer Login Page or Enter the URL (http://121.244.192.84:9999/CustomUI) in the address bar of browser (Chrome), and press Enter.
- Below login page will be loaded.
.png)
- Enter a valid username and password (sample user:- username: elxsi password: elxsi123)
- Click on Login.
Follow the steps below to login as a new operator
- Click on the sign-up link to create a new operator.
- Once clicked below page will be loaded.
.png)
- Enter the operator name, Username, Password and select the OEM.
- Note down the Username since the same value should be given in the OPERATOR_ID in box configuration discussed later.
- Once all values are entered click on the submit button.
- Dashboard screen will be displayed on successful login.
.png)
Client setup
The steps to connect to the server is given below:
Box Configuration
- Open /opt/www/build/static/server/Serverconfig.json in box.
- Serverconfig.json contains 3 fields:
“SERVER_URL “: URL of the CustomUI ( http://121.244.192.84:9999/CustomUI/)
“OPERATOR_ID “: Username given while creating a new operator (for default user : operator_id : teuser)
“ASSET_URL “: URL of the server from which assets are to be loaded (http://121.224.192.84:9999/)
- Save and reboot the box.
Customize the Application
Note: The configuration is to be done against each operator and each operator is identified by a unique operator_id . This operator_id should be same as operator_id in /opt/www/build/static/server/Serverconfig.json in box.
1. Home
- The order of the sections in the home screen can be customized by the operator.
- Click the Home button on the top bar of dashboard, below page will be displayed
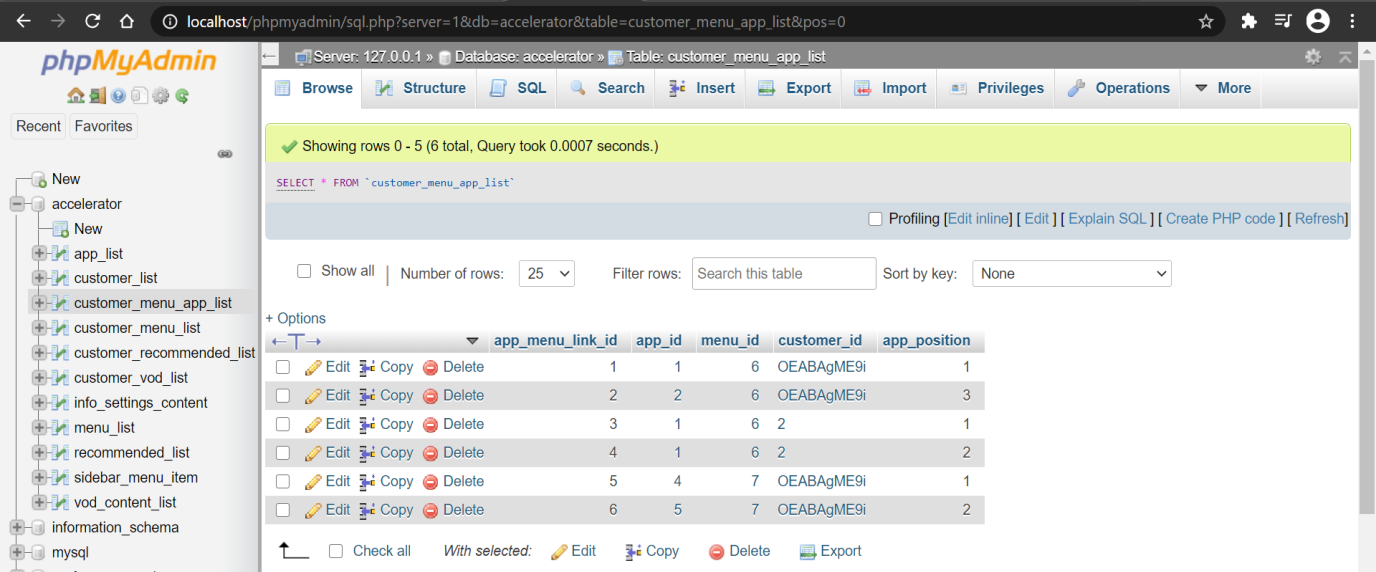
- Click on the customer_menu_app_list table through phpMyAdmin page.

- Click on the Insert button to add Customer data.
- Premium apps feature in main menu of Accelerator UI app can be enabled by setting 6 in the menu_id field.
[6 here refers to the Premium app content against that customer id] - Individual Premium apps in the Accelerator UI app can be enabled by setting the app_id field.
[values for app_id can be referred from app_list table, see picture below with YouTube is 1, Netflix is 2 etc]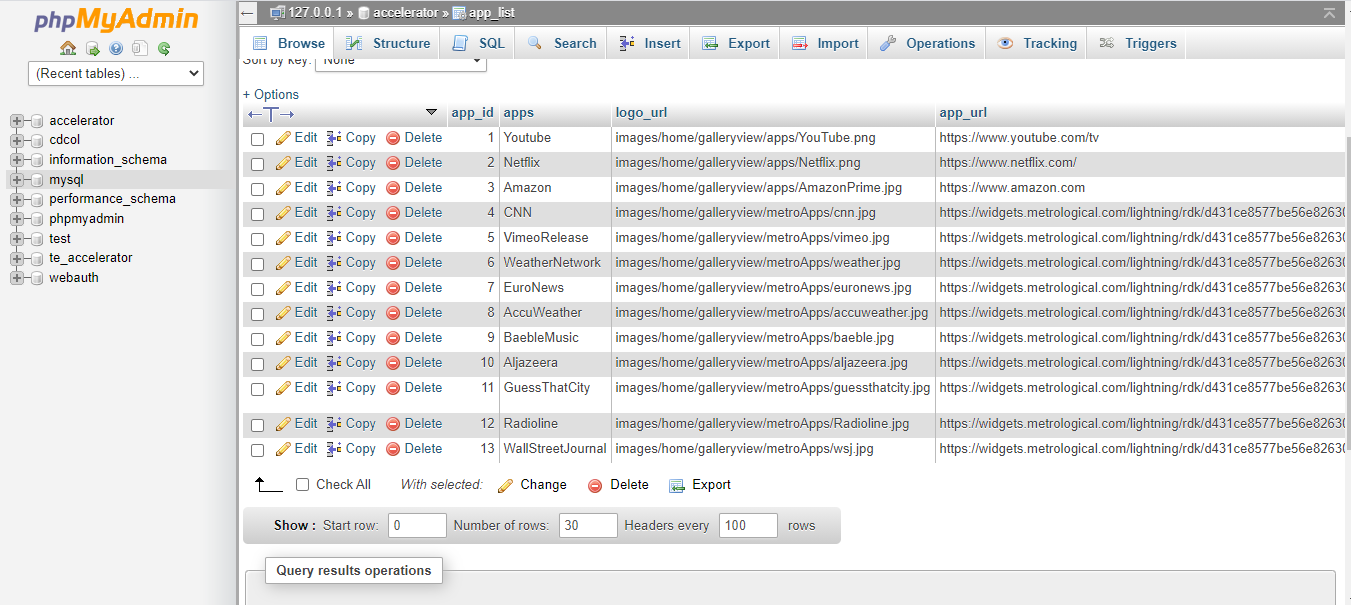
e.g. For enabling YouTube in first position
click on customer_menu_app_list -> click on insert
->Add → menu_id : 6
→ app_id : 1
→ app_position :1
→customer_id : boxid (serial_number)
3. Steps to Disable a Premium App for a customer
- Click on the customer_menu_app_list table.
- Delete the entry with app_id of the app to be disabled corresponding to the required customer_id.
e.g. To delete Netflix premium app for a customer with customer_id: OEABAgME9i.
→ click on customer_menu_app_list .
→ Delete the entry corresponding to customer_id -> OEABAgME9i with app_id is 2.
4. Steps to update an entry in table
- Click on the Edit button from the respective rows that is to be updated.
- Make the required update and click on Go button.
5. Steps to enable a customer to access Metro App content
- Click on the customer_menu_app_list table.
- Click on the Insert button to add Customer data .
- Metro apps feature can be enabled by setting 7 in the menu_id field.
[7 here refers to the Metro app content in menu_list table] - Individual Metro apps can be enabled by setting the value in app_id field.
[values for app_id can be referred from app_list table]
e.g. For enabling CNN in first position.
click on customer_menu_app_list → click on insert
→Add→ menu_id : 7
→ app_id : 4
→ app_position :1
→ customer_id : boxid(serial_number)
6. Steps to Disable a Metro App for a customer
- Click on the customer_menu_app_list table
- Delete the entry with app_id of the app to be disabled corresponding to the required customer_id.
e.g. To delete Radio line app for a customer with customer_id: OEABAgME9i.
→ click on customer_menu_app_list table.
→ Delete the entry corresponding to customer_id -> OEABAgME9i with app_id ->12.
7. Steps to add a Recommended for you content for a customer
- Click on the customer_recommended_list table through phpMyAdmin page.

- Click on the Insert button to add Customer data.
- Recommended For You content in main menu of demo app can be added for a particular customer by setting the required recommended_content_id against that customer_id.
[values of recommended_content_id can be referred from recommended_list table, see the picture below]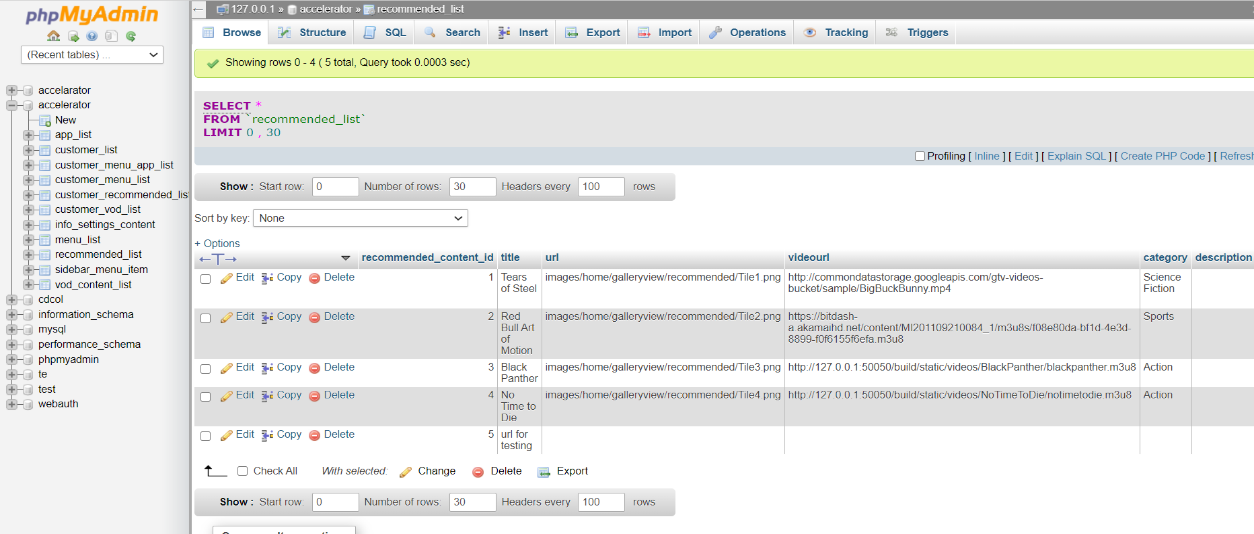
eg. For enabling Tears of steel.
click on customer_recommended_list → click on insert
→ Add → recommended_content_id : 1
→ customer_id : boxid (serial_number)
Note: To add a new content to recommended_list table
- Add a new recommended_content_id for the new content.
- Add the corresponding poster url in “url” field and video content url to “videourl” field.
- Add the corresponding category if it needs to displayed on the poster.
8. Steps to Remove a Recommended for you content for a customer
- Click on the customer_recommended_list table.
- Delete the entry with recommended_content_id of the content to be removed corresponding to the required customer_id.
9. Steps to add an icon in InfoBar for a customer
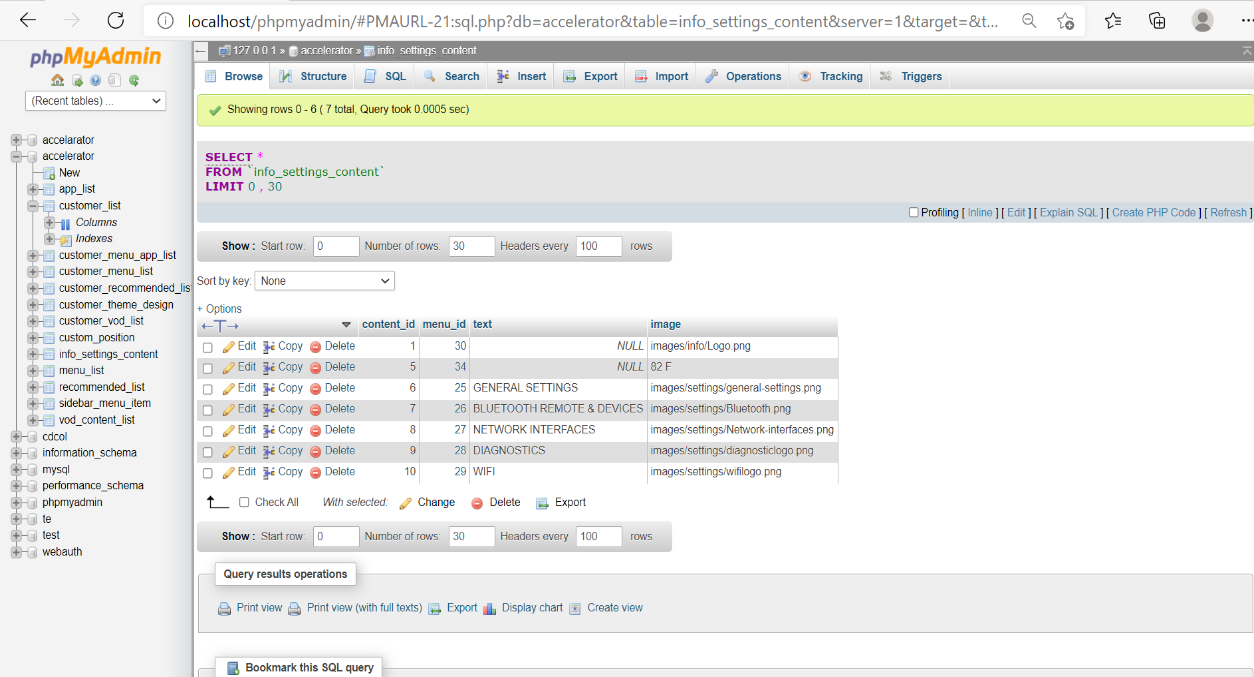
- Click on the info_settings_content table through phpMyAdmin page .
- Click on Insert button to add Infobar icon path.
- Infobar icon path can be added to the column of image in the table against corresponding menu name (i.e. icon name).
[menu_id can be referred from menu_list table]
e.g. For adding bluetooth icon to the infobar.
click on info_settings_content table-> click on insert
→ Add → menu_id : 32 (corresponding to Bluetooth InfoBar icon from menu_list table)
→ Image: ‘images/info/bluetooth.png’ (Add the local path of the icon in static folder )
10. Steps to delete an icon from the Infobar for a customer
- Click on the info_settings_content table.
- Delete the entry with path to the corresponding info bar icon to be removed.
e.g. For Deleting Wi-Fi icon from the InfoBar.
→ Click on the info_settings_content table
→ Delete the entry with path to the Wi-Fi icon
11. Steps to customize home screen background image/color, font face and font color for a customer
- Click on the customer_theme_design table .
- Click on the Insert button to add Customer data.
- Background image/ Background color, font face and font color for the Home Screen can be customized by setting 1 in the menu_id field.
- Value for each field can be added in the appropriate column of the table based on the customization requirements.
Note: If both bg_image and bg_color are configured in the table , preference is given to bg_image.

e.g. For Adding bg_color/bg_image , font face and font color for home screen .
click on customer_theme_design → click on insert
->Add → menu_id : 1
→ bg_image : images/settings/settings-bg.png
→ bg_color : 0xff211d30
→ FontFace : bold
→ text_fontColor: 0xff211d30
→ customer_id: boxid(serial_number)
12. Steps to customize settings screen background image/color, font face and font color for a customer
- Click on the customer_theme_design table.
- Click on the Insert button to add Customer data.
- Background image/ Background color, font face and font color for the Home Screen can be customized by setting 4 in the menu_id field.
- Value for each field can be added in the appropriate column of the table based on the customization requirements .
Note: If both bg_image and bg_color are configured in the table, preference is given to bg_image .
e.g. For Adding bg_color/bg_image , font face and font color for home screen
click on customer_theme_design -> click on insert
-> Add → menu_id : 1
→ bg_image : images/settings/settings-bg.png
→ bg_color : 0xff211d30
→ FontFace : bold
→ text_fontColor : 0xff211d30
→ customer_id : boxid(serial_number)
TroubleShooting
To confirm the client-server setup is working as expected:
- Ensure firewall is disabled
- Try the following URL in the browser first and then try the same using curl command in the box.
Browser:
http://localhost:8080/CustomUI/getThemeConfig?customer_id=OEABAgME9i
Box:
curl http://<Server_ip>:<Server_port>/CustomUI/getThemeConfig?customer_id=OEABAgME9i
If you are not getting data in the box try: ping <Server_ip>
eg: root@mediabox:~# ping 192.168.18.3
PING 192.168.18.3 (192.168.18.3): 56 data bytes
64 bytes from 192.168.18.3: seq=0 ttl=128 time=35.467 ms
64 bytes from 192.168.18.3: seq=1 ttl=128 time=2.238 ms
64 bytes from 192.168.18.3: seq=2 ttl=128 time=2.214 ms
If Ping is success, try http://192.168.18.3:8080/CustomUI/getPosition?customer_id=O in the browser to get the corresopnding data.
[“premium Apps”,”Recommended for you”,”metro Apps”]
Then try the curl for the same in the box:
~# curl http://192.168.18.3:8080/CustomUI/getPosition?customer_id=OEABAgME9i
response: [“premium Apps”,”Recommended for you”,”metro Apps”]
If you are getting the appropriate response for the curl, Then the client server connection is successful.
To get the corresponding customization changes in UI:
- Add the following in /opt/www/build/static/server/Serverconfig.json
“Server_ip”: ip address of the server machine in which the xampp server is setup
Note: Ping to this ip should be successful as we tried in the previous step
“Server_port”: port of Tomcat server - Add the following boxid in /opt/www/build/static/server/Serverconfig.json
“serial_number”: OEABAgME9i - Reboot
The corresponding changes will be reflected in the Accelerator UI.